KIA Niro: Basic Inspection Procedure
Measuring Condition of Electronic Parts' Resistance
The measured resistance at high temperature after vehicle running may be high or low. So all resistance must be measured at ambient temperature (20ºC, 68ºF), unless stated otherwise.
Warning
The measured resistance in except for ambient temperature (20ºC, 68ºF) is reference value.
Intermittent Problem Inspection Procedure
Sometimes the most difficult case in Troubleshooting is when a problem symptom occurs but does not occur again during testing. An example would be if a problem appears only when the vehicle is cold but has not appeared when warm. In this case, the technician should thoroughly make out a "Customer Problem Analysis Sheet" and recreate (simulate) the environment and condition which occurred when the vehicle was having the issue.
- Clear Diagnostic Trouble Code (DTC).
- Inspect connector connection, and check terminal for poor connections, loose wires, bent, broken or corroded pins, and then verify that the connectors are always securely fastened.
- Slightly shake the connector and wiring harness vertically and horizontally.
- Repair or replace the component that has a problem.
- Verify that the problem has disappeared with the road test.
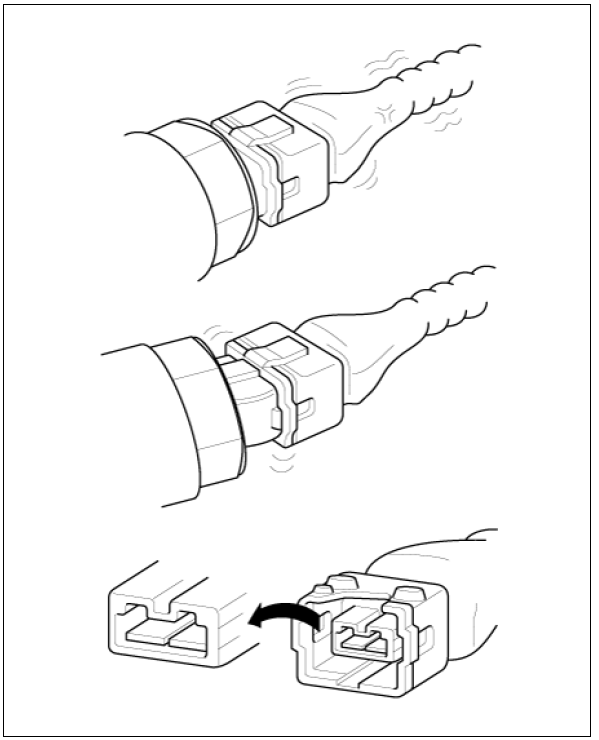
- Simulating Vibration
a. Sensors and Actuators
Slightly vibrate sensors, actuators or relays with finger.
Warning
Strong vibration may break sensors, actuators or relays
b. Connectors and Harness
Lightly shake the connector and wiring harness vertically and then horizontally.
- Simulating Heat
a. Heat components suspected of causing the malfunction with a hair dryer or other heat source.
Warning
- DO NOT heat components to the point where they may be damaged.
- DO NOT heat the ECM directly.
- Simulating Water Sprinkling
a. Sprinkle water onto vehicle to simulate a rainy day or a high humidity condition.
Warning
DO NOT sprinkle water directly into the engine compartment or electronic components.
- Simulating Electrical Load
a. Turn on all electrical systems to simulate excessive electrical loads (Radios, fans, lights, rear window defogger, etc.).
READ NEXT:
 Connector Inspection Procedure
Handling of Connector
a. Never pull on the wiring harness when disconnecting connectors.
b. When removing the connector with a lock, press or pull locking lever.
c. Listen for a click when locking connectors. This sound indicates that
Electrical Circuit Inspection Procedure
Check Open Circuit
Procedures for Open Circuit
Continuity Check
Voltage Check
If an open circuit occurs (as seen in (FIG. 1)), it can be found by
performing Step 2 (Continuity Check
Method) or Step 3 (Voltage Check Method) as s
Hybrid Control System - Service Data
Hybrid Power Control Unit (HPCU)
Brake Switch
Type : ON/OFF Switch
DC Fuse
High Voltage Battery System
Battery Pack Assembly
General Specification
Warning
Main high voltage battery pack assembly (180V) + Sub high voltag
SEE MORE:
CVVT & Camshaft Description and operation
Description
Continuous Variable Valve Timing (CVVT) system advances or retards the valve
timing of the intake and exhaust valve in accordance with the ECM control signal
which is calculated by the engine speed and load.
By controlling CVVT, th
Setting the power tailgate
Power tailgate opening speed
You can adjust the power tailgate opening
speed. Select the desired opening
speed (Fast / Slow) (Default setting is
Fast).
Operation
Instrument cluster (if equipped)
Select Settings ? Door ? Power
Tailgate Op
Categories
- Home
- KIA Niro EV, Hybrid - Second generation - (SG2) (2021-2024) - Owner's manual
- Kia Niro - First generation - (DE) (2017-2022) - Service and Repair Manual
- Contact Us