KIA Niro: Electrical Circuit Inspection Procedure
- Check Open Circuit
- Procedures for Open Circuit
- Continuity Check
- Voltage Check
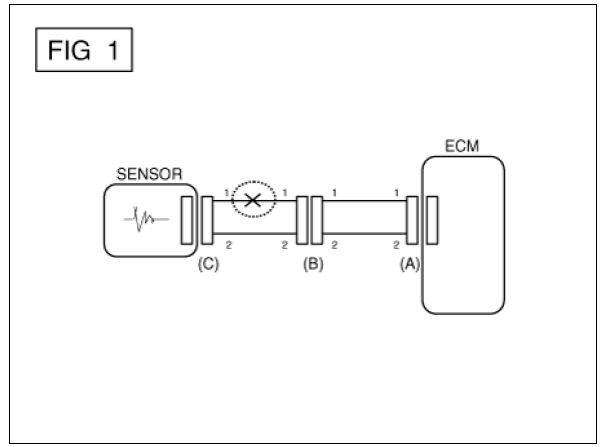
If an open circuit occurs (as seen in (FIG. 1)), it can be found by performing Step 2 (Continuity Check Method) or Step 3 (Voltage Check Method) as shown below.
- Continuity Check Method
Warning
When measuring for resistance, lightly shake the wire harness above and below or from side to side.
Specification (Resistance)
1Ω or less Õ Normal Circuit
1MΩ or Higher Õ Open Circuit
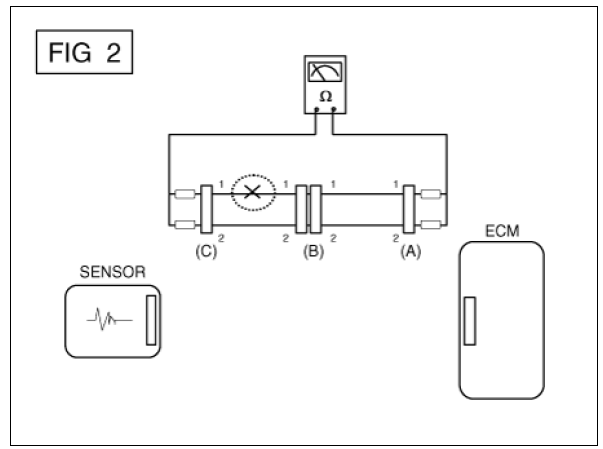
- Disconnect connectors (A), (C) and measure resistance between connector
(A) and (C) as shown in (FIG.
2).
In (FIG.2.) the measured resistance of line 1 and 2 is higher than 1kΩ and below 1 Ω respectively.
Specifically the open circuit is line 1 (Line 2 is normal). To find exact break point, check sub line of line 1 as described in next step.
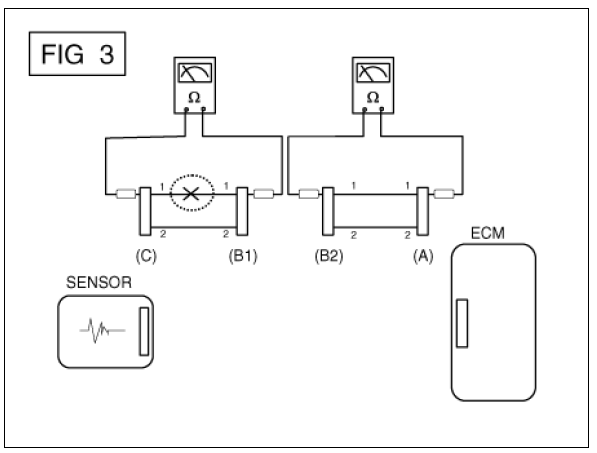
- Disconnect connector (B), and measure for resistance between connector
(C) and (B1) and between (B2)
and (A) as shown in (FIG. 3).
In this case the measured resistance between connector (C) and (B1) is higher than 1MΩ and the open circuit is between terminal 1 of connector (C) and terminal 1 of connector (B1).
- Voltage Check Method
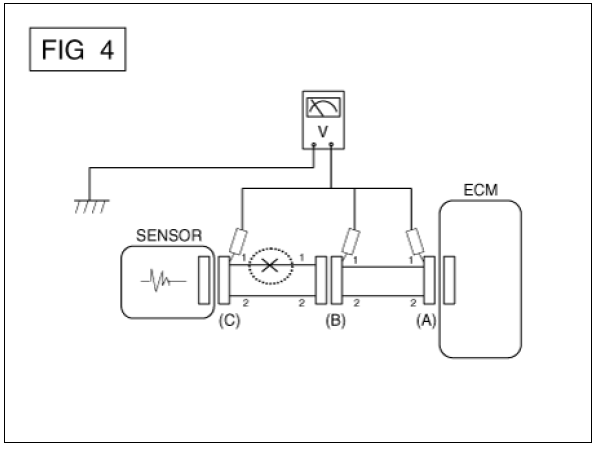
a. With each connector still connected, measure the voltage between the chassis ground and terminal 1 of each connectors (A), (B) and (C) as shown in (FIG. 4).
The measured voltage of each connector is 5V, 5V and 0V respectively. So the
open circuit is between
connector (C) and (B).
- Check Short Circuit
- Test Method for Short to Ground Circuit
- Continuity Check with Chassis Ground
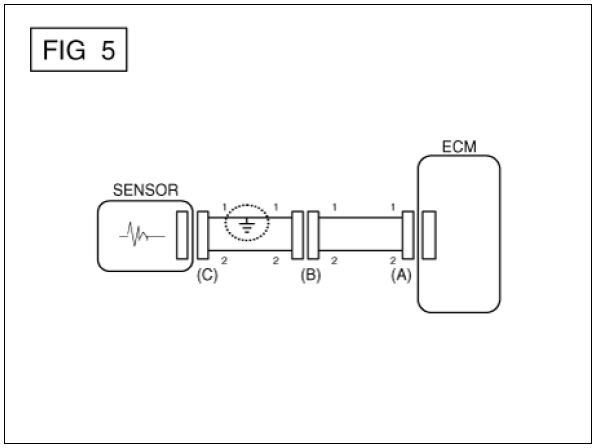
If short to ground circuit occurs as shown in (FIG. 5), the broken point can be found by performing Step 2 (Continuity Check Method with Chassis Ground) as shown below.
- Continuity Check Method (with Chassis Ground)
Warning
Lightly shake the wire harness above and below, or from side to side when measuring the resistance.
Specification (Resistance)
1Ω or less Õ Short to Ground Circuit
1MΩ or Higher Õ Normal Circuit
a. Disconnect connectors (A), (C) and measure for resistance between connector (A) and Chassis Ground as shown in (FIG. 6).
The measured resistance of line 1 and 2 in this example is below 1 Ω and higher than 1MΩ respectively.
Specifically the short to ground circuit is line 1 (Line 2 is normal). To find exact broken point, check the sub line of line 1 as described in the following step.

b. Disconnect connector (B), and measure the resistance between connector (A)
and chassis ground, and
between (B1) and chassis ground as shown in (FIG. 7).
The measured resistance between connector (B1) and chassis ground is 1Ω or less.
The short to ground
circuit is between terminal 1 of connector (C) and terminal 1 of connector (B1).

READ NEXT:
 Hybrid Control System - Service Data
Hybrid Power Control Unit (HPCU)
Brake Switch
Type : ON/OFF Switch
DC Fuse
High Voltage Battery System
Battery Pack Assembly
General Specification
Warning
Main high voltage battery pack assembly (180V) + Sub high voltag
Hybrid Control System - Tightening Torques
Hybrid Control System
High Voltage Battery System
High Voltage Battery Control System
High Voltage Battery Cooling System
Low Voltage DC/DC Converter (LDC)
High Voltage Battery Charging System
Power Cable
Spec
SEE MORE:
Smart Key System
Specifications
Smart Key Unit
RF Receiver
Smart Key
Antenna
Smart Key System / Components And Components Location
Component Location (1)
Smart key unit (SMK)
Interior antenna 1
Interior antenna 2
Buzzer
Door outsid
Release Residual Pressure in Fuel Line | Fuel Tank Repair procedures
Warning
Whenever the high pressure fuel fuse, fuel pipe, delivery pipe, or injector is removed immediately after shutting off the engine, an injury may be caused by the release of highly pressurized fuel.
Release the residual pressure in the
Categories
- Home
- KIA Niro EV, Hybrid - Second generation - (SG2) (2021-2024) - Owner's manual
- Kia Niro - First generation - (DE) (2017-2022) - Service and Repair Manual
- Contact Us