KIA Niro: Main/ Sub High Voltage Battery
Main High Voltage Battery
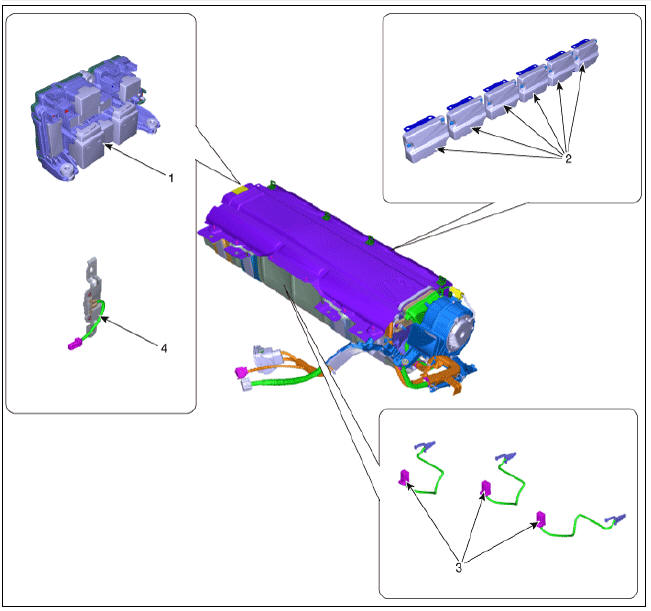
- Power Relay Assembly (PRA)
- Cell Monitoring Unit (CMU)
- Battery Temperature Sensor
- Runaway Arresting Device (RAD)
Warning
Main Relays (Positive, Negative), Pre-Charge Relay, Pre-Charge Resistor, and Battery Current Sensor are integrated into the PRA.
Sub High Voltage Battery
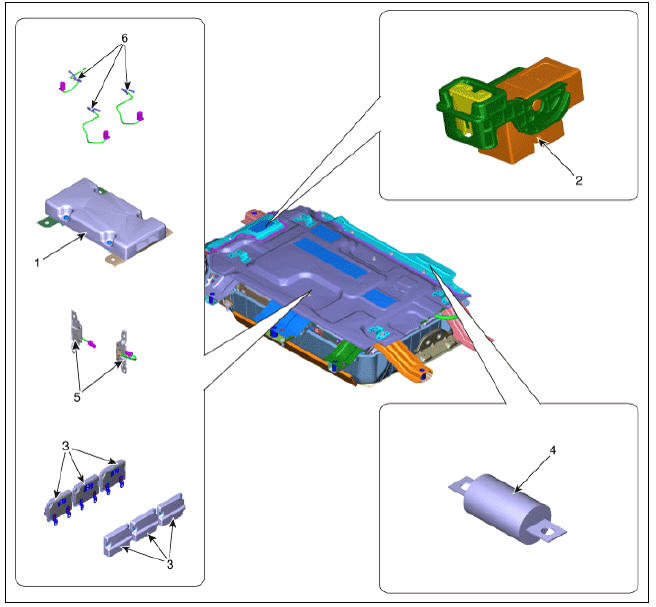
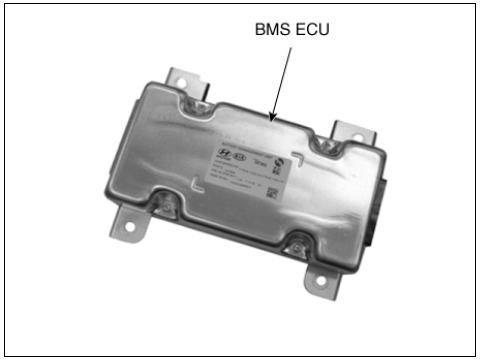
- BMS ECU
- Safety Plug
- Cell Monitoring Unit (CMU)
- Main Fuse
- Runaway Arresting Device (RAD)
- Battery Temperature Sensor
Warning
Main Relays (Positive, Negative), Pre-Charge Relay, Pre-Charge Resistor, and Battery Current Sensor are integrated into the PRA.
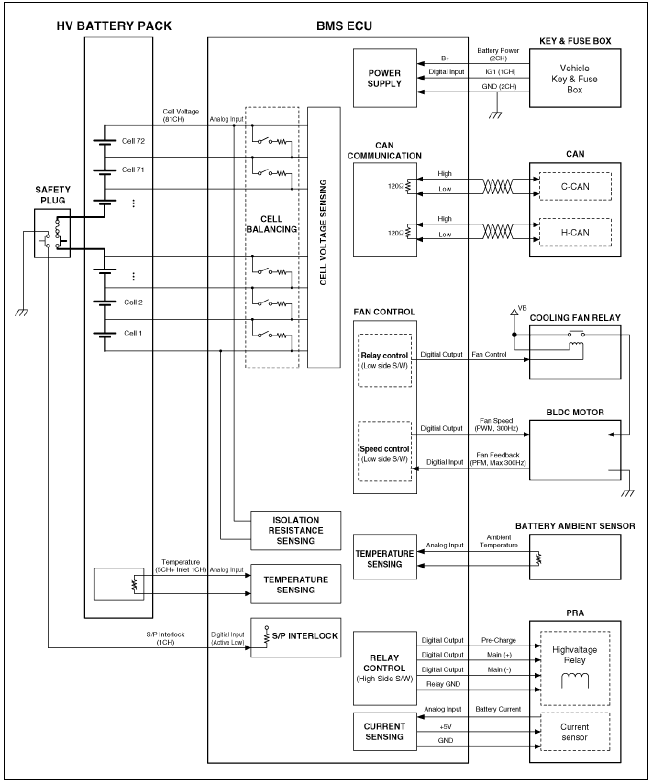
Schematic Diagram

Troubleshooting Flow

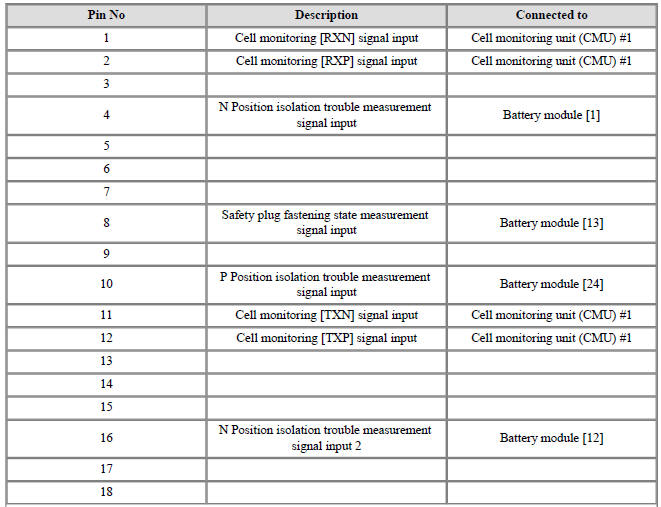
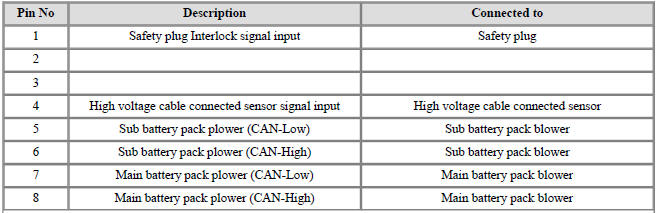
BMS ECU Terminal and Input/Output Signal

Terminal Funxtion
Connector (B11-1A)
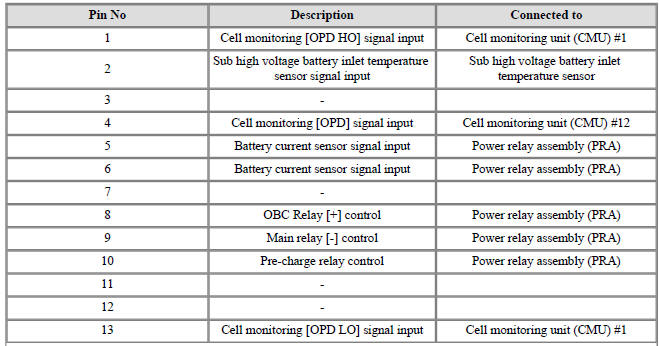

Connector (B11-1B)

Connector (B11-2A)

Connector (B11-2B)

Sub High Voltage Battery - Removal
Warning
- Be sure to read and follow the "General Safety Information and Caution" before doing any work related with the high voltage system. Failure to follow the safety instructions may result in serious electrical injuries.
- Be sure to read and follow the "High Voltage Shut-off Procedures" before doing any work related with the high voltage system. Failure to follow the safety instructions may result in serious electrical injuries.
- Turn ignition switch OFF and disconnect the negative (-) battery terminal.
- Shut off the high voltage circuit.
(Refer to Hybrid Control System - "High Voltage Shut-off Procedures")
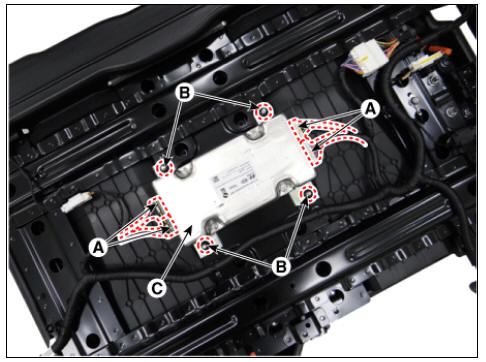
- Remove the sub high voltage battery rear cover (A) after loosening the mounting bolts.
High Voltage Battery Rear Cover mounting bolt : 7.8 - 11.8 N*m (0.8 - 1.2 kgf*m, 5.8 - 8.7 lb*ft)
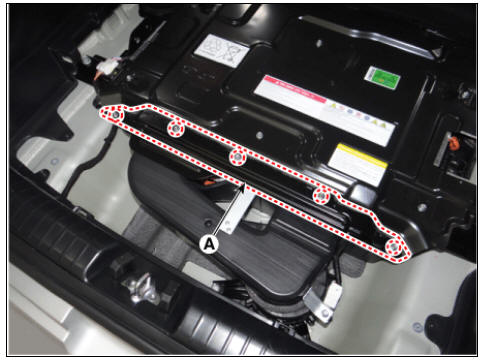
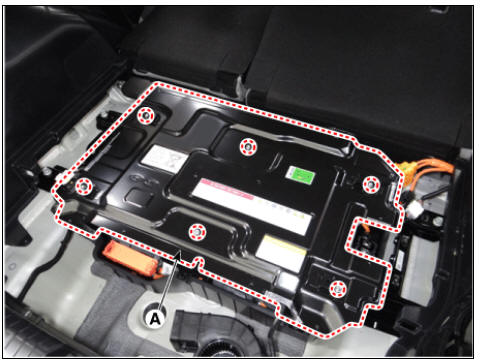
- Remove the sub high voltage battery cover (A) after loosening the mounting bolts.
High Voltage Battery Cover mounting bolt : 7.8 - 11.8 N*m (0.8 - 1.2 kgf*m, 5.8 - 8.7 lb*ft)
- Disconnect the BMS connector (A).
- Remove the BMS ECU after loosening the mounting nuts (B).
BMS ECU mounting nut : 7.8 - 11.8 N*m (0.8 - 1.2 kgf*m, 5.8 - 8.7 lb*ft)
Installation
Warning
- Be sure to read and follow the "General Safety Information and Caution" before doing any work related with the high voltage system. Failure to follow the safety instructions may result in serious electrical injuries.
- Be sure to read and follow the "High Voltage Shut-off Procedures" before doing any work related with the high voltage system. Failure to follow the safety instructions may result in serious electrical injuries.
- Install the BMS ECU in the reverse order of removal.
- Safety Plug Description and operation
- The Power Relay Assembly
- Pre-Charge Relay
- Pre-Charge Resistor
- Battery Current Sensor
- Battery Temperature Sensor
READ NEXT:
 Safety Plug Description and operation
Description
Safety Plug is installed on the rear side of the high voltage battery and it
can mechanically shut the
high voltage circuit off when servicing the high voltage system. (i.e. High
Voltage Battery, Power
Relay Assembly, HPCU, BMS ECU
The Power Relay Assembly
Specification
Description
The Power Relay Assembly (PRA) consists of the positive and negative main
relays, pre-charge relay, pre-charge resistor and
battery current sensor. It is located inside the battery pack assembly and
controls the h
Pre-Charge Relay
Specification
Description
The Power Relay Assembly (PRA) consists of the positive and negative main
relays, pre-charge relay, pre-charge resistor and
battery current sensor. It is located inside the battery pack assembly and
controls the h
SEE MORE:
Sunroof Assembly | Sunroof Sunshade
Sunroof Assembly
Replacement
Warning
When removing with a flat-tip screwdriver or remover, wrap protective tape around the tools to prevent damage to components.
Put on glove to protect your hands.
Remove the roof
Parking on hills
Generally, if you have a trailer attached
to your vehicle, you should not park your
vehicle on a hill. People can be seriously
or fatally injured, and both your vehicle
and the trailer can be damaged if unexpectedly
roll down hill.
However, i
Categories
- Home
- KIA Niro EV, Hybrid - Second generation - (SG2) (2021-2024) - Owner's manual
- Kia Niro - First generation - (DE) (2017-2022) - Service and Repair Manual
- Contact Us