KIA Niro: Front Wiper Motor
Front wiper motor
Rear wiper motor
Front Wiper Motor Repair procedures
Removal
Front Wiper Motor
- Remove the cowl top cover.
(Refer to Body - "Cowl Top Cover")
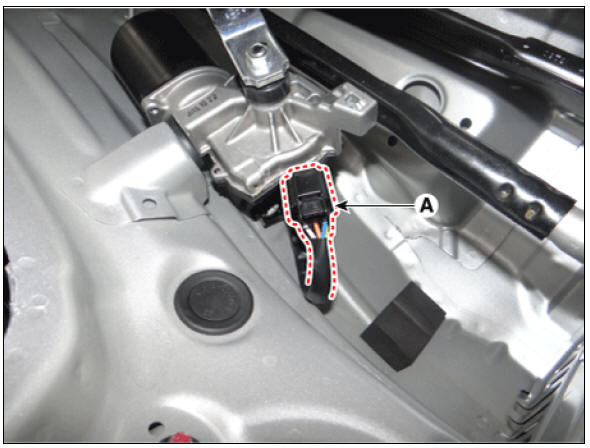
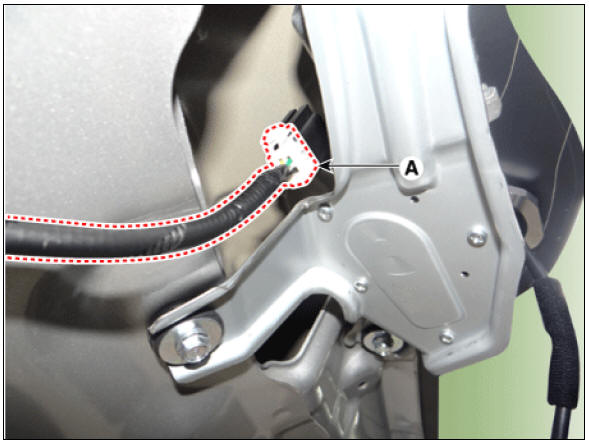
- Disconnect the wiper motor connector (A).
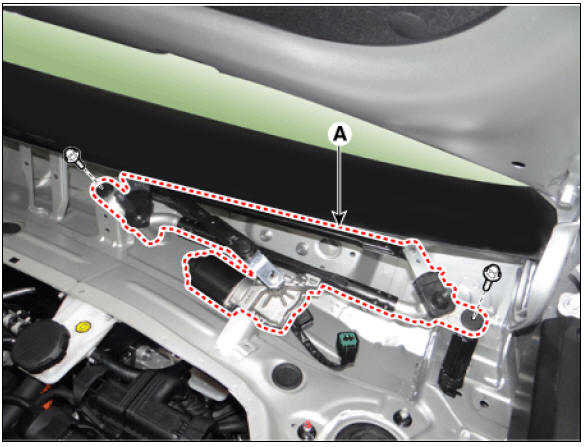
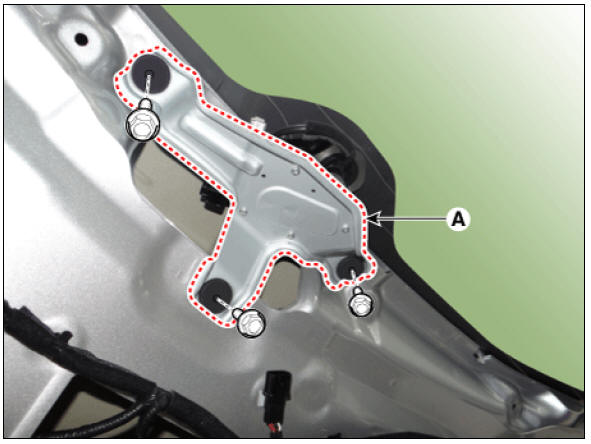
- Remove the wiper motor & linkage assembly (A) after loosening the mounting bolts.
Tightening torque : 6.9 - 10.8 N*m (0.7 - 1.1 kgf*m, 5.1 - 8.0 lb*ft)
Rear Wiper Motor
- Remove the rear wiper.
(Refer to Wiper/Washer - "Wiper Arm")
- Remove the tailgate trim.
(Refer to Body - "Tailgate Trim")
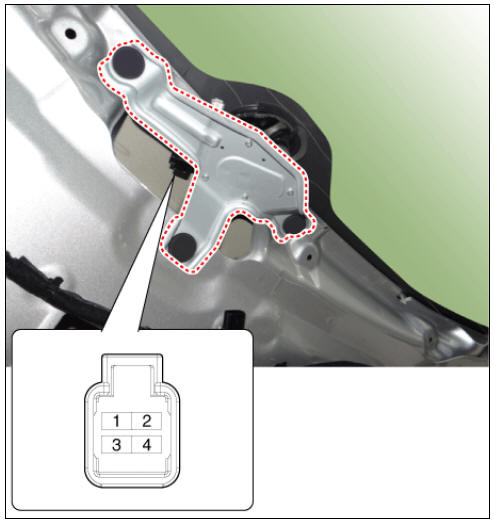
- Disconnect the rear wiper motor connector (A).
- Remove the rear wiper motor (A) after loosening the bolts.
Tightening torque : 6.9 - 10.8 N*m (0.7 - 1.1 kgf*m, 5.1 - 8.0 lb*ft)
Installation
- Install in the reverse order of the removal.
Inspection
Diagnosis With KDS
- In the body electrical system, failure can be quickly diagnosed by using the vehicle diagnostic system (KDS).
The diagnostic system(KDS) provides the following information.
(1) Self diagnosis : Checking failure and code number (DTC).
(2) Current data : Checking the system input/output data state.
(3) Actuation test : Checking the system operation condition.
(4) Additional function : Controlling other features including system option setting and zero point adjustment.
- Select the 'Car model' and the 'Body Control Module (BCM)' to be checked in order to check the vehicle with the tester.
- Select the 'Current Data' menu to search the current state of the input/output data.
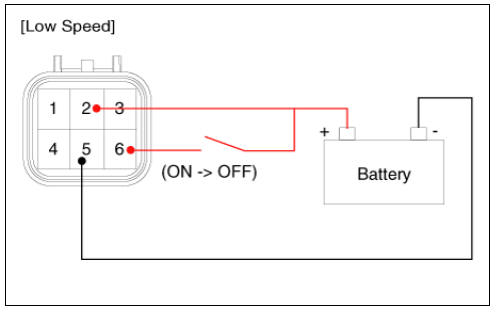
Front Wiper Motor Inspection
- Disconnect the front wiper motor connector.
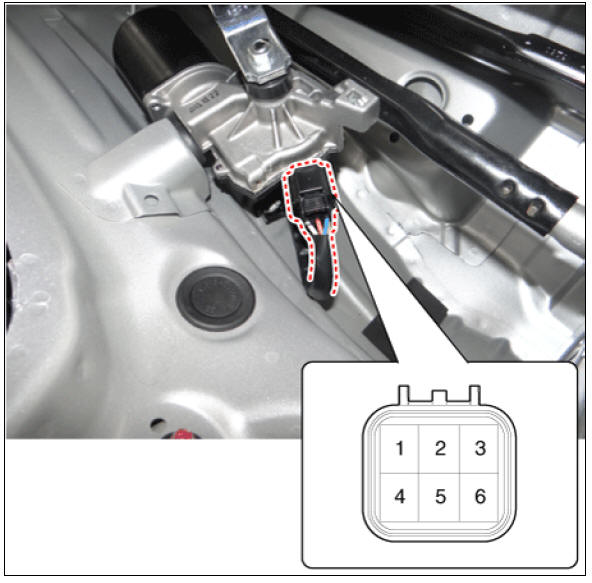
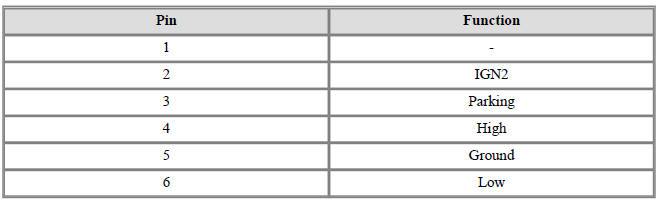
- Attach the positive (+) lead from the battery to terminal 2 and the negative (-) lead to terminal 5.
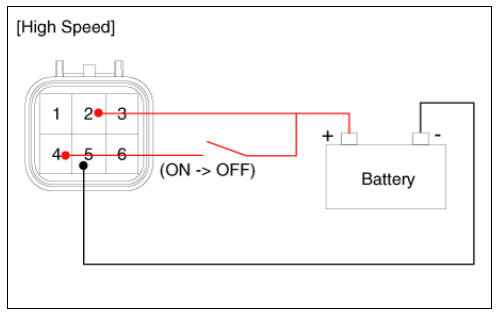
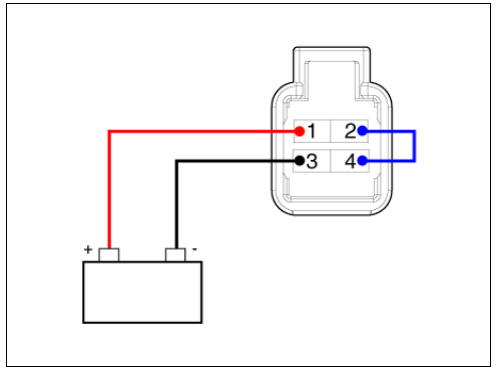
Rear Wiper Motor Inspection
- Disconnect the rear wiper motor connector.
- Connect positive (+) battery cables to terminal 4 and negative (-) battery cables to terminal 3 respectively.
- Check that the motor operates normally. If they are abnormal, replace the wiper motor.
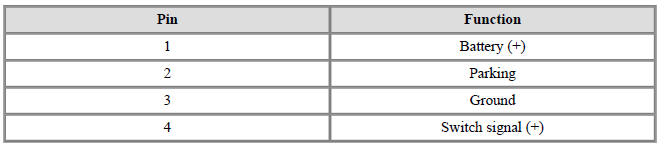
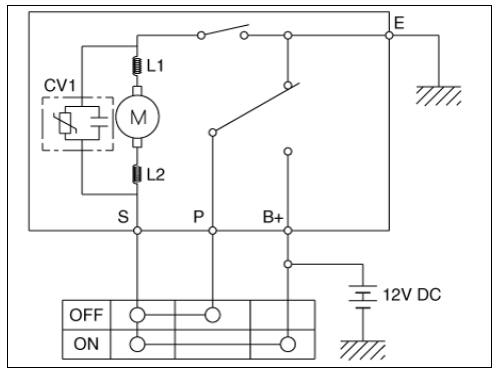
Rear Wiper Motor Automatic Stop Operation Check
- Operate the motor at low speed using the stalk control.
- Stop the motor operation anywhere except at the off position by disconnecting the motor connector.
- Connect the positive (+) lead from the battery to terminal 1 and the negative (-) lead to terminal 3.
- Connect the motor terminal 2 and terminal 4.
- Check that the motor stops running at the off position.
READ NEXT:
 Front Washer Motor Repair procedures
Inspection
With the washer motor connected to the reservoir tank, fill the
reservoir tank with water.
Warning
Before filling the reservoir tank with water, check the filter for
foreign material or
contamination. if necessary, clean the
Rain Sensor Repair procedures
Inspection
Check point for rain sensor:
To properly adjust sensitivity if auto wiping operates sensitively or
insensitively.
To check if a connector of sensor is normally connected
To check if sensor and bracket are normal
Gel pad
Replacement
Remove the damaged silicone gel pad completely on the lens plate of rain
sensor.
Warning
The silicone gel must be fully detached from the rain sensor by
rubbing it off with the fingers
without any tool.
The surface
SEE MORE:
Crash Pad Side Cover
Crash Pad Side Cover Components and components location
LH
Crash pad side cover (LH)
RH
Crash pad side cover (RH)
Crash Pad Side Cover Repair procedures
Replacement
Warning
Put on gloves to protect your hands.
Warning
U
Lane Following Assist settings
Lane Following Assist is designed to help
detect lane markings and/or vehicles on
the road, and assists the driver's steering
to help center the vehicle in the lane.
Detecting sensor
Front view camera
The front view camera is used as a
Categories
- Home
- KIA Niro EV, Hybrid - Second generation - (SG2) (2021-2024) - Owner's manual
- Kia Niro - First generation - (DE) (2017-2022) - Service and Repair Manual
- Contact Us