KIA Niro: Delivery Pipe Repair procedures
Kia Niro - First generation - (DE) (2017-2022) - Service and Repair Manual / Engine Control / Fuel System / Fuel Delivery System / Delivery Pipe Repair procedures
Removal
Warning
In case of removing the high pressure fuel pump, high pressure fuel pipe, delivery pipe, and injector, there may be injury caused by leakage of the high pressure fuel. So don't do any repair work right after engine stops.
- Release the residual pressure in fuel line.
(Refer to the Fuel Delivery System -"Release Residual Pressure in Fuel Line").
- Switch "OFF" the ignition and disconnect the negative (-) terminal of the auxiliary 12V battery.
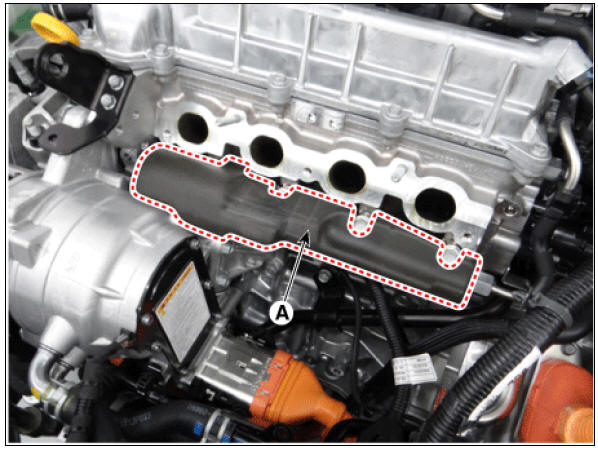
- Remove the intake manifold.
(Refer to Engine Mechanical System - "Intake Manifold")
- Remove the injector form (A).
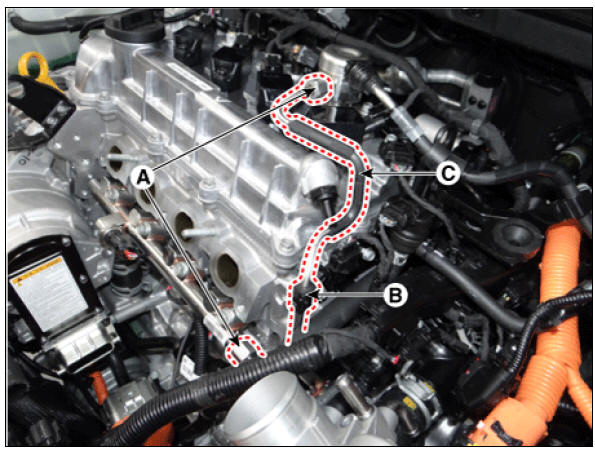
- Remove the high pressure pipe flange nuts (A) by using the special service tool (SST No. 09314 - 3Q100 or 09314 - 27130).
- Remove the high pressure fuel pipe (C) after loosening the function block mounting bolt (B).
High pressure fuel pipe function block mounting bolt: 9.8 - 11.8 N*m (0.8 - 1.2 kgf*m, 7.2 - 8.7 lb*ft) High pressure fuel pipe flange nut: 26.5 - 32.4 N*m (2.7 - 3.3 kgf*m, 19.5 - 23.9 lb*ft)
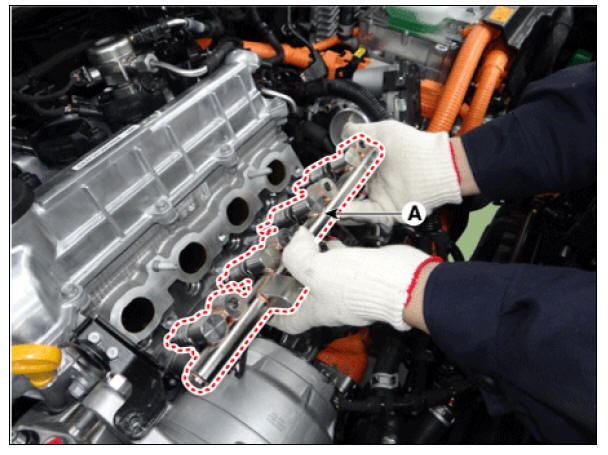
- Remove the delivery pipe & injector assembly mounting bolts (A).
Delivery pipe & injector assembly mounting bolt: 18.6 - 23.5 N*m (1.9 - 2.4 kgf*m, 13.7 - 17.4 lb*ft)

- Remove the delivery pipe & injector assembly (A) from the engine.

Installation
Warning
- Do not reuse injector fixing clips.
- Install the component to the specified torque.
- Note that internal damage may occur when the component is dropped. In this case, use it after inspecting.
- Apply engine oil to the injector O-ring.
- Do not reuse injector o-rings.
- Do not reuse bolts.
- When inserting the injector, be careful not to damage the injector tip.
- Do not reuse the high pressure fuel pipe.
- Install in the reverse order of removal.
READ NEXT:
 High Pressure Fuel Pump Repair procedures
Warning
In case of removing the high pressure fuel pump, high pressure fuel
pipe, delivery pipe, and injector, there may be injury
caused by leakage of the high pressure fuel. So don't do any repair work right
after engine stops.
Release th
Engine Clutch System
Specifications
Clutch Cover and Disc
Engine Clutch Actuator
Service Standard
Tightening Torques
Lubricants
Special Service Tools
Tool Name /
Number/
Illustration / Description
Clutch disc
guide
09411-1P000/ /Use
Engine Clutch Actuator
Components
Clutch disc
Clutch cover
Concentric slave cylinder
Hybrid motor assembly
Engine clutch actuator
Reservoir
Specifications
Schematic Diagrams
Harness Connector
Engine Clutch Actuator Repair procedu
SEE MORE:
Engine Control Module (ECM) Repair procedures
ECM Terminal And Input/Output signal
ECM Terminal Function
Connector (A)
Connector (K)
ECM Terminal Input/Output Signal
Connector (A)
Connector (K)
Engine Control Module (ECM)
Armed stage
The system provides an
audible alarm and the hazard
warning lights blink if
triggered. The system is
operated in 3 stages.
Armed stage
Operation
Lock the doors by pressing the lock
button on the key or door handle.
The hazard warning li
Categories
- Home
- KIA Niro EV, Hybrid - Second generation - (SG2) (2021-2024) - Owner's manual
- Kia Niro - First generation - (DE) (2017-2022) - Service and Repair Manual
- Contact Us