KIA Niro: Connector Inspection Procedure
Kia Niro - First generation - (DE) (2017-2022) - Service and Repair Manual / Engine Control / Fuel System / Basic Troubleshooting / Connector Inspection Procedure
- Handling of Connector
- Never pull on the wiring harness when disconnecting connectors.
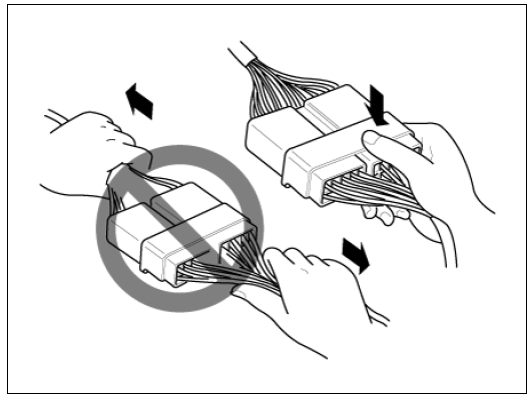
- When removing the connector with a latch, press or pull locking lever.
- Listen for a click when locking connectors. This sound indicates that they are securely locked

- When a tester is used to check for continuity, or to measure voltage, always insert tester probe from wire harness side.
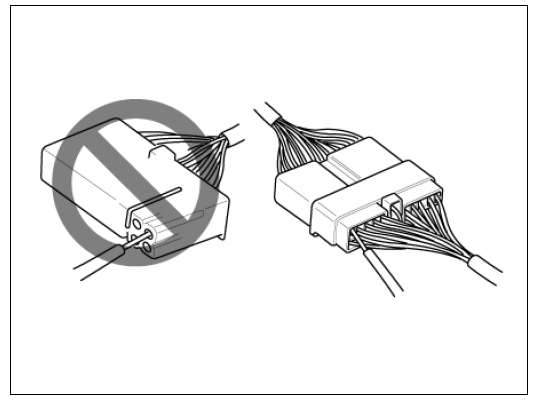
- Check waterproof connector terminals from the connector side. Waterproof connectors cannot be accessed from harness side.

Warning
- Use a fine wire to prevent damaging the terminal.
- Do not damage the terminal when inserting the tester lead.
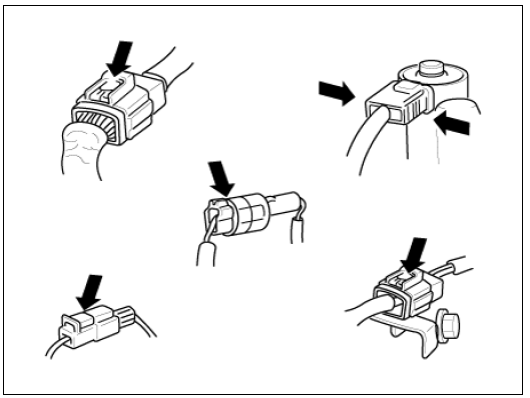
- Checking Point for Connector
- While the connector is connected: Hold the connector, and check connecting condition and locking efficiency.
- When the connector is disconnected:
Check for missing terminal, crimped terminal or broken core wire by lightly
pulling the wire harness.
Visually check for rust, contamination, deformation and bending.
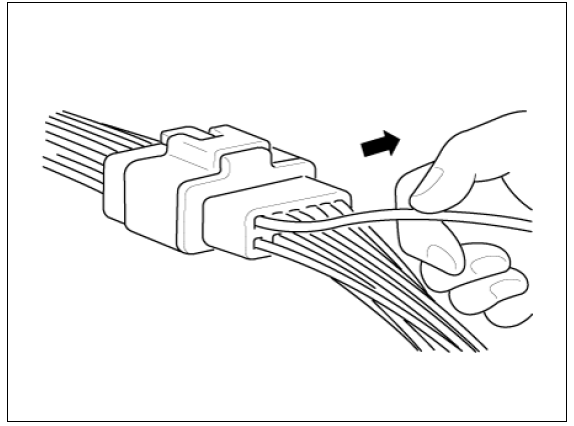
- Check terminal tightening condition: Insert a spare male terminal into a female terminal, and then check terminal tightening conditions.
- Pull lightly on individual wires to ensure that each wire is secured in the terminal.
- Connector Terminal Repairing Method
- Clean the contact points using air gun and/or shop rag.
Warning
Never use sand paper when polishing the contact points, otherwise the contact point may be damaged.
- In case of abnormal contact pressure, replace the female terminal.
Wire Harness Inspection Procedure
- Before removing the wire harness, check the wire harness position and crimping in order to restore it correctly.
- Check for twisted, pulled or loose wire harness.
- Check if the temperature of the wire harness is abnormally high.
- Check for rotating, moving or vibrating wire harness against the sharp edge of a part.
- Check the connection between the wire harness and any installed part.
- If the covering of wire harness is damaged; secure, repair or replace the harness.
READ NEXT:
 Electrical Circuit Inspection Procedure
Open Circuit Test
Procedures for Open Circuit
Continuity Check
Voltage Check
If an open circuit occurs (as seen in (FIG. 1)), it can be found by
performing Step 2 (Continuity Check Method) or Step 3
(Voltage Check Method) as shown b
Engine Control System
Components
Location
Engine Control Module (ECM)
Manifold Absolute Pressure Sensor (MAPS)
Mass Air Flow Sensor (MAFS)
Intake Air Temperature Sensor (IATS)
Engine Coolant Temperature Sensor (ECTS) (Water Temperature Control
Assem
Engine Control System / Description And Operation
Description
If the Gasoline Engine Control system components (sensors, ECM, injector, etc.)
fail, interruption to the fuel supply or failure
to supply the proper amount of fuel for various engine operating conditions will
result. The following
SEE MORE:
AC charging connector
lock
This AC charging connector lock function
prevents an outsider from removing
the charging connector from the
charging inlet.
Connector lock
Always lock
The connector locks when the charging
connector is plugged into the charging
inlet. The
Lane Keeping Assist operation
Turning Lane Keeping Assist On/ Off
Whenever the vehicle is turned off and
on, Lane Keeping Assist will always turn
on and the white ( ) indicator
light
will appear on the cluster.
Press and hold the Lane Driving Assist
button to turn o
Categories
- Home
- KIA Niro EV, Hybrid - Second generation - (SG2) (2021-2024) - Owner's manual
- Kia Niro - First generation - (DE) (2017-2022) - Service and Repair Manual
- Contact Us