KIA Niro: Sub High Voltage Battery
Removal
Warning
- Be sure to read and follow the "General Safety Information and Caution" before doing any work related with the high voltage system. Failure to follow the safety instructions may result in serious electrical injuries.
- Be sure to read and follow the "High Voltage Shut-off Procedures" before doing any work related with the high voltage system. Failure to follow the safety instructions may result in serious electrical injuries.
Sub High Voltage Battery
- Switch "OFF" the ignition and disconnect the negative (-) terminal of the auxiliary 12V battery.
- Shut off the high voltage circuit.
(Refer to Hybrid Control System - "High Voltage Shutoff Procedure")
- Remove the sub high voltage battery system assembly.
(Refer to High Voltage Battery System - "Removal")
- Remove the high voltage battery watertight case.
(Refer to High Voltage Battery System - "Case")
- Disconnect the cell monitoring unit connector (A).
- Remove the cell monitoring unit (B) after loosening the mounting screws.
Cell Monitoring Unit #1

Cell Monitoring Unit #2

Cell Monitoring Unit #3

Cell Monitoring Unit #4

Cell Monitoring Unit #5

Cell Monitoring Unit #6

Main High Voltage Battery
- Switch "OFF" the ignition and disconnect the negative (-) terminal of the auxiliary 12V battery.
- Shut off the high voltage circuit.
(Refer to Hybrid Control System - "High Voltage Shutoff Procedure")
- Remove the main high voltage battery system assembly.
(Refer to High Voltage Battery System - "Removal")
- Disconnect the cell monitoring unit connector (A).
- Remove the cell monitoring unit (B) after loosening the mounting screws.
Cell Monitoring Unit #7

Cell Monitoring Unit #8

Cell Monitoring Unit #9

Cell Monitoring Unit #10

Cell Monitoring Unit #11

Cell Monitoring Unit #12

Installation
Warning
- Be sure to read and follow the "General Safety Information and Caution" before doing any work related with the high voltage system. Failure to follow the safety instructions may result in serious electrical injuries.
- Be sure to read and follow the "High Voltage Shut-off Procedures" before doing any work related with the high voltage system. Failure to follow the safety instructions may result in serious electrical injuries.
- Install in the reverse order of removal.
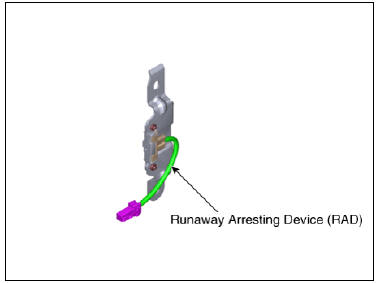
Description
The Runaway Arresting Device (RAD) is attached to the upper part of each module.
If the high voltage battery is swollen due to overcharging of the battery cell, the main relay (+), main relay (-), and pre-charge relay coil ground lines are cut off via RAD to prevent the operation of the main relay and pre-charge relay in case of overcharging.
If the high voltage battery is in normal condition, the switch is intact. The switch is cut off if the cell is overcharged.
When the switch is cur off, it is impossible to drive.


Sub High Voltage Battery

Main High Voltage Battery

Circuit Diagram

READ NEXT:
 Main High Voltage Battery Temperature Sensor
Removal
Warning
Be sure to read and follow the "General Safety Information and
Caution" before doing any work
related with the high voltage system. Failure to follow the safety
instructions may result in
serious electrical in
Cooling Fan Description and operation | Cooling Fan Repair procedures
Component
Location
Cooling Fan #1
Cooling Fan #2
Main High Voltage Battery Cooling Duct (Inlet)
Main High Voltage Battery Cooling Duct (Outlet)
Sub High Voltage Battery Cooling Duct (Inlet)
Sub High Voltage Battery
SEE MORE:
Electric Power Steering
Description
MDPS (Motor Driven Power Steering) system uses an electric motor to assist
the steering force and it
is an engine operation independent steering system.
MDPS control module controls the motor operation according to information
re
LCD display messages
V2L finished. Defined charge level reached
A: V2L finished. Defined charge level
reached
When the high voltage battery level
reaches the discharging limit set level,
the V2L will stop and the warning will be
displayed. If you want to use th
Categories
- Home
- KIA Niro EV, Hybrid - Second generation - (SG2) (2021-2024) - Owner's manual
- Kia Niro - First generation - (DE) (2017-2022) - Service and Repair Manual
- Contact Us