KIA Niro: Intake Actuator
Intake Actuator Components and components location
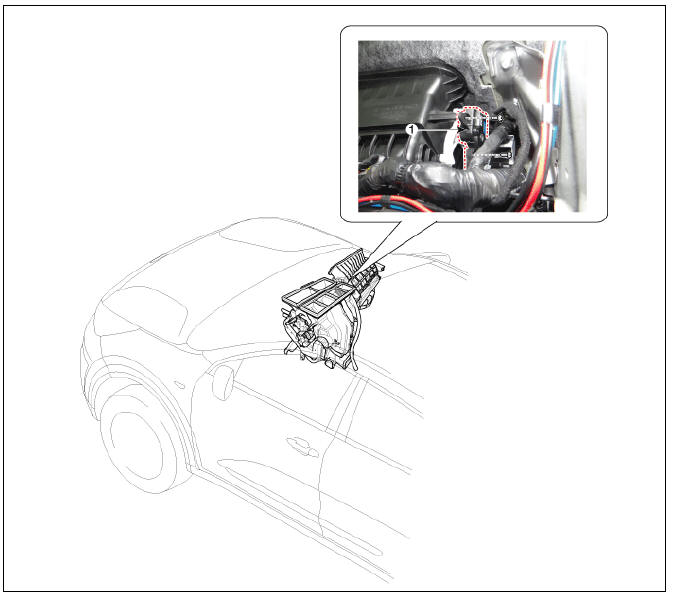
- Intake actuator
Description
Located in the blower unit, the intake actuator regulates the intake door based on the signal from the control unit. Pressing the intake selection switch will shift between recirculation and fresh air modes.
Intake Actuator Repair procedures
Inspection
- Switch "OFF" the ignition.
- Disconnect the intake actuator connector.
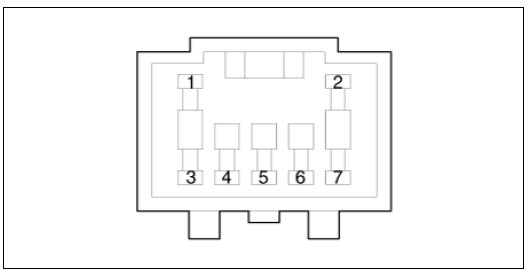
- Verify that the intake actuator operates to the fresh position when connecting 12V to terminal 3 and grounding terminal 4.
Verify that the intake actuator operates to the recirculation position when connected in reverse.
- -
- -
- Fresh air
- Sensor (+ 5V)
- Feedback signal
- Sensor ground
- Recirculated air
- Connect the intake actuator connector.
- Switch "ON" the ignition.
- Check the voltage between terminals 5 and 6.
Specification

It will feedback the current position of the actuator to controls.
- If the intake actuator does not operate well, substitute with a known-good intake actuator and check for proper operation.
- Replace the intake actuator if it is proved that there is a problem with it.
Replacement
- Disconnect the negative (-) battery terminal.
- Remove the smart key unit.
(Refer to Body Electrical System - "Smart Key Unit")
- Disconnect the connector (A) and then remove the intake actuator (B) after loosening the screws.

- Install in the reverse order of removal.
READ NEXT:
 Heater & A/C Control Unit
Heater & A/C Control Unit / Components And Components Location
Connector A
Connector B
Heater & A/C Control Unit / Repair Procedures
Self Diagnosis
Self-diagnosis process.
Warning
When operating the self-diagno
Heater
Heater Unit Components and components location
Heater unit assembly
Components
LH
Heater Core Cover
Heater Core Assembly
PTC Heater
Duct Sensor
Shower Duct (LH)
Evaporator lower case insulation
Heater Lower Case
Drain
Heater Unit Repair procedures
Replacement
Warning
When prying with a flat-tip screwdriver or a prying trim tool, wrap
a protective tape around the related parts and the tool to
prevent damage.
Disconnect the negative (-) battery terminal.
Recover the refrigerant with a
SEE MORE:
Ignition Switch
Ignition Switch / Repair Procedures
Inspection
Disconnect the key warning switch connector (A) and ignition switch
connector (B) from the steering column.
Check for continuity between the terminals.
If continuity is not specif
User settings mode
In this mode, you can change the settings
of the instrument cluster, doors,
lights, etc.
* The information provided may differ
depending on which functions are
applicable to your vehicle.
Driver Assistance (if equipped)
Head-Up
Categories
- Home
- KIA Niro EV, Hybrid - Second generation - (SG2) (2021-2024) - Owner's manual
- Kia Niro - First generation - (DE) (2017-2022) - Service and Repair Manual
- Contact Us