KIA Niro: Ignition Coil Repair procedures | Spark Plug Repair procedures
Removal
- Turn ignition switch OFF and disconnect the battery negative (-) terminal.
- Remove the engine cover.
- Disconnect the ignition coil connector (A).
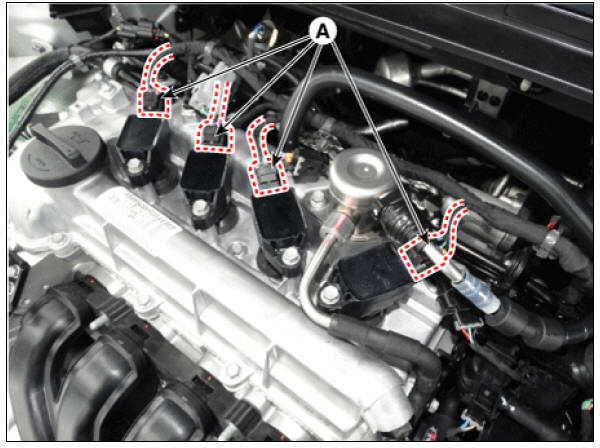
- Remove the ignition coil (A) after loosening the mounting bolt.
Ignition coil mounting bolt : 9.8 - 11.8 N*m (1.0 - 1.2 kgf*m, 7.2 - 8.7 Ib*ft)

Warning
When removing the ignition coil connector, pull the lock pin (A) and push the clip (B). 
Installation
- Install in the reverse order of removal.
Warning
- Install the ignition coil with the specified torque.
- If ignition coil is dropped, it may cause internal damage. Do not use it.
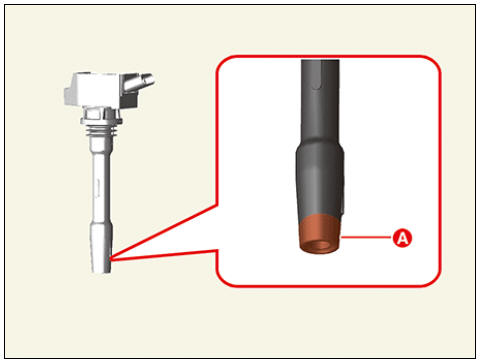
- When assembling the parts, clean the contaminated area (A) with the cloth.
- The cloth should be clean, free of contaminants, and soft enough to not damage the parts.
(When replacing ignition coil and spark plug together, cleaning is not required.)

Spark Plug Repair procedures
Specification

Description
An ignition coil is an induction coil in an engine's ignition system which transforms the battery's low voltage to the high voltage needed to create an electric spark in the spark plugs to ignite the fuel. Coils have an internal resistor while others rely on a resistor wire or an external resistor to limit the current flowing into the coil from the battery 12 V supply.

Inspection
On vehicle inspection
- Accelerate the engine to about 3,000 rpm 3 times or more.
- Remove the spark plug.
- Check the spark plug visually.
If the electrode is dry, the spark plug is normal.
If the electrode is wet, check the damage and electrode gap as below.
Component Inspection
- Check the spark plug for any damage on its thread and insulator.
If there is damage, replace the spark plug.
- Check the electrode. Measure the insulation resistance with an ohmmeter.
If the resistance is less than the specified value, adjust the electrode gap.
Specification: 10 MΩ or more
- Check the spark plug electrode gap.
If the gap is greater than the maximum, replace the spark plug.
Specification: 0.7 - 0.8 mm (0.0276 - 0.0314 in.)
Warning
If adjusting the gap of a new spark plug, bend only the base of the ground electrode. Do not touch the tip.
Never attempt to adjust the gap on a used plug.

Cleaning
The combustion temporarily becomes unstable, due to the aged fuel and the carbon deposits accumulated on the spark plug(s) after long-term storage.
1st Method
- Start the engine and keep the engine running at idle for 2 minutes.
- Step on the accelerator pedal and hold it steady at 4500 rpm with the shift lever in N position to warm up the engine until the temperature of the engine coolant reaches 80ºC.
- Keep the engine running at 2500 - 3000 rpm in the N position for 15 minutes.

2nd Method
Warning
The 2nd method should be performed only if the 1st method fails (the misfire-related codes recur).
- Start the engine and keep the engine running at idle for 2 minutes.
- Drive the vehicle for over 20 minutes, keeping the engine speed above 3500 rpm.
Warning
If equipped with manual transaxle, shift the gear properly for keeping the engine speed above 3500 rpm.

Removal
- Remove the ignition coil.
(Refer to Ignition System - "Ignition Coil")
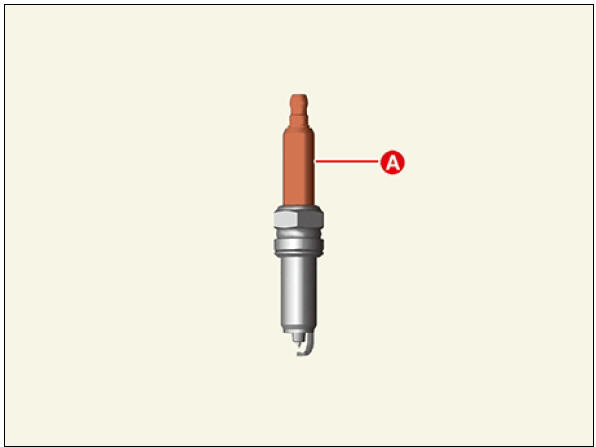
- Using a spark plug wrench, remove the spark plug (A).
spark plug :
19.6 - 24.5 N*m (2.0 - 2.5 kgf*m, 14.5 - 18.0 Ib*ft)

Warning
Be careful that no contaminates enter into spark plug holes.
Installation
- Install in the reverse order of removal.
Warning
- Install the spark plug with the specified torque.
- Be careful not to damage external electrode when installing the spark plug.
- If spark plug is dropped, it may cause internal damage. Do not use it.
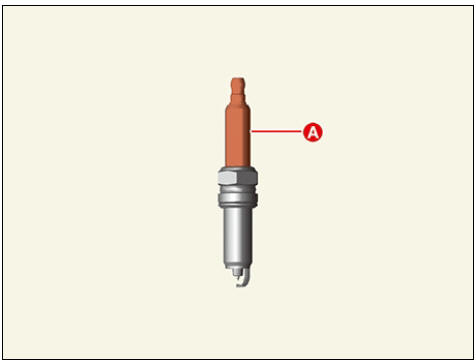
- When assembling the ignition plug, clean the contaminated area (A) with the cloth.
- The cloth should be clean, free of contaminants, and soft enough to not damage the parts.
(When replacing ignition coil and spark plug together, cleaning is not required.)
READ NEXT:
 Emission Control System
Components Location
PCV Valve
Canister
Purge Control Solenoid Valve (PCSV)
Fuel Tank Pressure Sensor (FTPS)
Fuel Level Sensor (FLS)
Fuel tank air Filter
Catalytic converter (WCC)
Gasoline Particulate Filter (GPF)
PCV Valve
Crankcase Emission Control System
Schematic Diagram
Repair procedures
Inspection
After disconnecting the vapor hose from the PCV valve, remove the PCV
valve.
Reconnect the PCV valve to the vapor hose.
Run the engine at idle, then put a finger over the open end of the
SEE MORE:
Opening the fuel filler door (Plug-in hybrid vehicle)
Stop the engine. To open the fuel filler
door, push the fuel filler door opener
button.
Wait until the fuel tank is depressurized.
The message is displayed when
the fuel filler door unlocks after the
fuel tank is depressurized.
Green Zone Drive Mode for Europe (Kia NIRO Hybrid)
In order to protect the atmospheric environment
in urban areas, EV mode is
expanded when entering the road inside
the green zone based on the navigation
information.
Also, EV mode is expanded based on the
driving history when departing from
Categories
- Home
- KIA Niro EV, Hybrid - Second generation - (SG2) (2021-2024) - Owner's manual
- Kia Niro - First generation - (DE) (2017-2022) - Service and Repair Manual
- Contact Us