KIA Niro: HLA (Hydraulic Lash Adjuster)
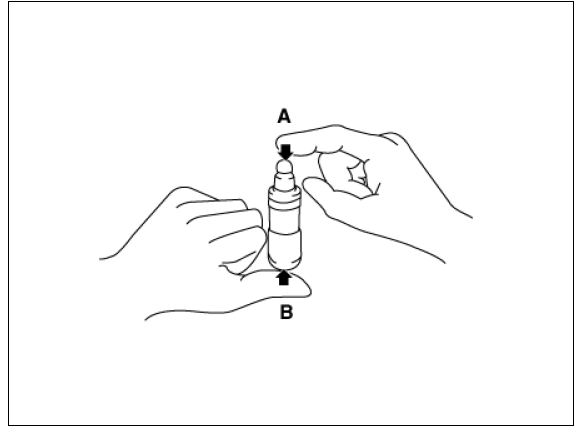
With the HLA filled with engine oil, hold A and press B by hand.
If B moves, replace the HLA.


Reassembly
Warning
- Thoroughly clean all parts to be assembled.
- Before installing the parts, apply fresh engine oil to all sliding and rotating surfaces.
- Replace oil seals with new ones.
- Install the valves.
(1) Using the SST (09222-2G100), push in a new stem seal.

Warning
- Do not reuse old valve stem seals.
- Incorrect installation of the seal could result in oil leakage past the valve guides.
(2) Install the valve, valve spring and spring retainer.
Warning
Place the valve springs so that the side coated with enamel faces toward the valve spring retainer and then installs the retainer.
(3) Using the SST (09222-3K000, 09222-3K100), compress the spring and install the retainer locks.
Before releasing the valve spring compressor, ensure that the retainer locks are correctly in place after pushing down and releasing the compressor handle 2 - 3 times.

Warning
- When installing the SST, insert the front support (A) directly into the bolt hole on the cylinder head.
- Do not press valve retainer by more than 12 mm (0.47 in.).
Installation
Warning
- Thoroughly clean all parts to be assembled.
- Always use new cylinder head and manifold gaskets.
- Always use new cylinder head bolts. Cylinder head bolts are toque-to-yield bolts designed to be permanently elongated beyond the state of elasticity when torqued. Reusing the removed bolts can cause the bolts to break or fail to maintain clamping force.
- The cylinder head gasket is a metal gasket. Be careful not to bend it.
- Rotate the crankshaft to set the No.1 piston at TDC (Top dead center) on compression stroke.
- Install the cylinder head gasket on the cylinder block.
(1) Remove hardening sealant, oil, dust, moisture and harmful foreign materials from the cylinder block and the cylinder head.
(2) Apply liquid gasket on the edge of the cylinder block.
Sealant:
Threebond 1217H or equivalent

(3) Install the cylinder head gasket (A) with the dowel pins of the cylinder block.

(4) Apply liquid gasket on the edge of the cylinder head gasket.
Sealant:
Threebond 1217H or equivalent

Warning
Assemble the cylinder head gasket and the cylinder head within 5 minutes after applying sealant.
- Install the cylinder head assembly.
(1) Carefully place the cylinder head (A) so as not to damage the gasket.

(2) Tighten the cylinder head bolts and plate washers, in several passes, in the sequence shown.
Tightening torque : (12.7 - 16.7 N.m (1.3 - 1.7 kgf.m, 9.4 - 12.3 lb-ft)) + (120 - 125º) + (120 - 125º)

Warning
Always use new cylinder head bolts. Cylinder head bolts are
torque-to-yield bolts designed to be
permanently elongated beyond the state of elasticity when torqued, so if the
bolts are removed and
reused, it may cause the bolts to break or fail to maintain clamping force.
- Install the hydraulic lash adjuster (HLA) (A) and the swing arm (B).

(1) When installing HLA, it should be held upright so that engine oil in HLA may not spill and assured that dust does not adhere to HLA.
(2) HLA should be inserted carefully to the cylinder head not to spill engine oil.
Warning
Stroke the lash adjuster in engine oil by pushing its cap 4 to 5
times while pushing the ball down slightly
using a hard steel wire. Be careful not to give the ball a hard push because the
ball weighs just several
grams. If it is installed with engine oil spilt out of the lash adjuster and air
in it, abnormal noise may be
generated. 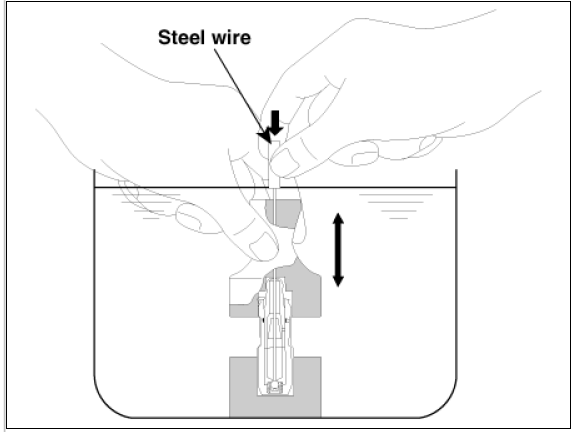
- Install the remaining parts in the reverse order of removal.
- Add all the necessary fluids and check for leaks.
Connect KDS. Check for codes, note, and clear. Recheck.
Warning
- Refill engine with engine oil.
- Refill the radiator the reservoir tank with engine coolant.
- Clean battery posts and cable terminals and assemble.
- Inspect for fuel leakage.
- After assembling the fuel line, switch on the ignition (without operating the starter) so that the fuel pump runs for approximately two seconds and fuel line pressurizes.
- Repeat this operation two to three times, then check for fuel leakage at any point in the fuel line.
- Bleed air from the cooling system.
- Start engine and let it run until it warms up (until the radiator fan operates 3 to 4 times).
- Turn off the engine. Check the level in the radiator, add coolant if needed. This will allow trapped air to be released from the cooling system.
- Put radiator cap on tightly, then run the engine again and check for leaks.
READ NEXT:
 Drive Belt / Idler Repair procedures
Drive Belt Repair procedures
Removal
Remove the engine room under cover.
(Refer to Engine and Transaxle Assembly - "Engine Room Under Cover")
Remove the drive belt.
(1) Using the wrench, turning the mechanical tensioner (A) co
Drive Belt Tensioner Repair procedures
Removal and
Installation
Remove the drive belt.
(Refer to Drive Belt System - "Drive Belt")
Remove the mechanical tensioner (A).
Tightening torque :
18.6 - 23.5 N*m (1.9 - 2.4 kgf*m, 13.7 - 17.4 lb*ft)
Remove the hydr
SEE MORE:
High Voltage (HV) battery (lithium-ion polymer)
On-Board Charger (OBC): Transforms
(inverts) AC power charge
power, to DC power, to charge the
high voltage battery
Inverter: Transforms direct current
into alternating current to supply
power to the motor, and transforms
alternating
HEV/PHEV powertrain (Kia Niro Hybrid only)
By following a few simple precautions
for the first 6,000 km (4,000 miles) you
may increase the performance economy
and life of your vehicle.
Do not race the engine.
Avoid hard stops, except in emergencies,
to allow the brakes to seat prop
Categories
- Home
- KIA Niro EV, Hybrid - Second generation - (SG2) (2021-2024) - Owner's manual
- Kia Niro - First generation - (DE) (2017-2022) - Service and Repair Manual
- Contact Us