KIA Niro: Electric Water Pump (EWP) Repair procedures | Reservoir
Kia Niro - First generation - (DE) (2017-2022) - Service and Repair Manual / Hybrid Motor System / Hybrid Motor Cooling System / Electric Water Pump (EWP) Repair procedures | Reservoir
Removal
- Disconnect the negative (-) cable of the 12V battery.
- Remove the under cover.
(Refer to Engine Mechanical System - "Engine Room Under Cover")
- Drain the coolant of hybrid motor cooling system.
(Refer to Hybrid Motor Cooling System - "Coolant")
- Separate the hose (A) from the reservoir.
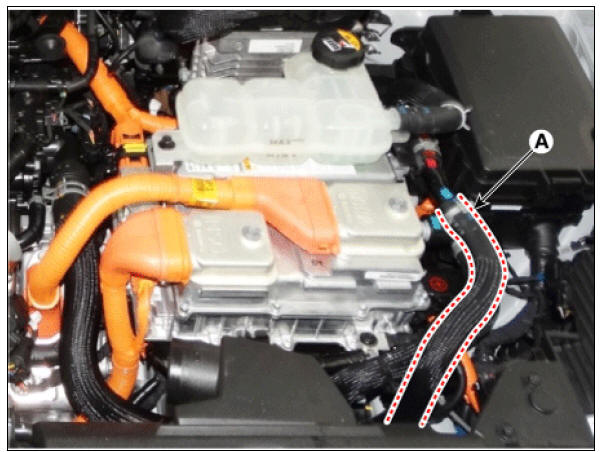
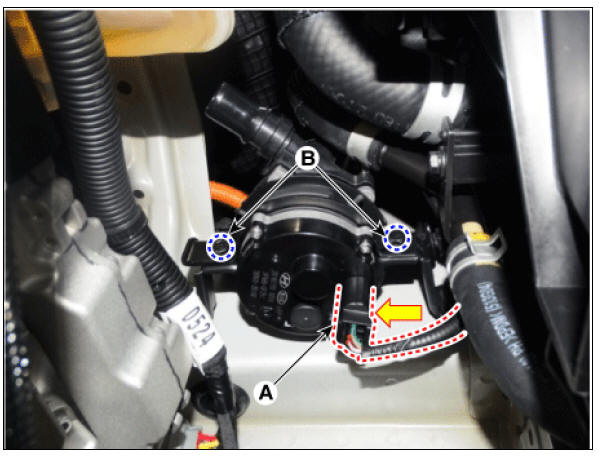
- Separate the hose (A).

- Disconnect the connector (A).
- Remove the electric water pump (EWP) after removing the bolts (B).
Tightening torque : 9.8 - 11.8 N*m (1.0 - 1.2 kgf*m, 7.2 - 8.7 lb*ft)

Installation
- Install in the reverse order of removal.
Warning
- Be careful not to damage other hoses nearby when tightening the clamp.
- Install the clamp in the specified direction to prevent interference with surrounding components.
- Refill the hybrid motor cooling system with coolant and then perform the air bleeding using the KDS.
(Refer to Hybrid Motor Cooling System - "Coolant")
- After installing, check for leakage of coolant or fluid from hose connection during engine start.
Reservoir
Component location
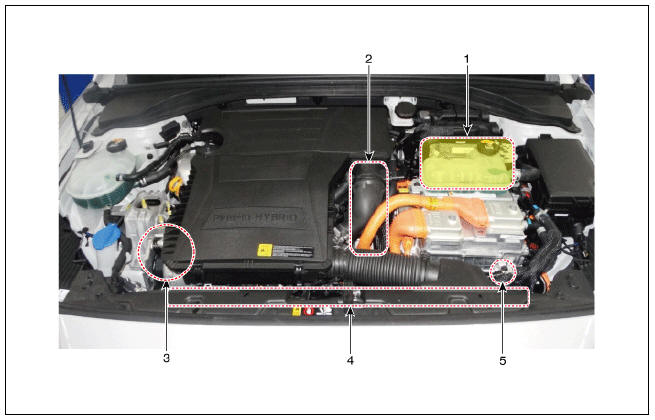
- Reservoir
- Hybrid drive motor
- Hybrid starter generator (HSG)
- Electrical radiator
- Electric water pump (EWP)
Reservoir Repair procedures
Removal
- Remove the under cover.
(Refer to Engine Mechanical System - "Engine Room Under Cover")
- Drain the coolant of hybrid motor cooling system.
(Refer to Hybrid Motor Cooling System - "Coolant")
- Separate the hose (A) and then remove the reservoir (B) by loosening the bolts.
Tightening torque : 7.8 - 11.8 N*m (0.8 - 1.2 kgf*m, 5.8 - 8.7 lb*ft)

Installation
- Install in the reverse order of removal.
Warning
- Be careful not to damage other hoses nearby when tightening the clamp.
- Install the clamp in the specified direction to prevent interference with surrounding components.
- Refill the hybrid motor cooling system with coolant and then perform the air bleeding using the KDS.
(Refer to Hybrid Motor Cooling System - "Coolant")
- After installing, check for leakage of coolant or fluid from hose connection during engine start.
Inspection
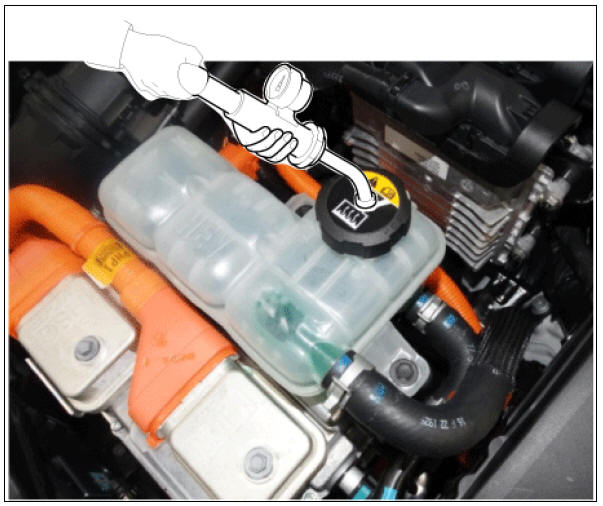
Inverter Reservoir Cap Testing
- Remove the inverter reservoir cap, wet its seal with coolant, and then install it on a pressure tester and SST (0K253-G5100).

- Apply a pressure of 93.16 - 122.58kPa (0.95 - 1.25kgf/cm², 13.51 - 17.78psi).
- Check for a drop in pressure.
- If the pressure drops, replace the cap.
Radiator Leakage Test
- Wait until engine is cool, then carefully remove the inverter reservoir cap and fill the reservoir with coolant, then install it on the pressure tester.
- Apply a pressure tester to the reservoir and apply a pressure of 93.16 - 122.58kPa (0.95 - 1.25kgf/cm², 13.51 - 17.78psi).
- Inspect for inverter coolant leaks and a drop in pressure.
- Remove the tester and reinstall the inverter reservoir cap.
READ NEXT:
 Coolant Repair procedures
Refilling And Bleeding
Warning
Never remove the cap when the engine is hot. Serious scalding could
be caused by hot fluid under high pressure escaping
from the reservoir.
Warning
When pouring inverter coolant, be sure to shut the relay box lid
Driveshaft and axle
Service Data
Tightening Torques
Lubricants
Special Service Tools
Tool Name / Number/ Illustration/ Description
Ball joint puller
09568-34000/ / Remove the ball
joint
Puller
09495-33000/ /Used for removal of
spider assembly
SEE MORE:
Vehicle modifications
Vehicle modifications
This vehicle should not be modified.
Modification of your vehicle could affect
its performance, safety or durability and
may even violate governmental safety
and emissions regulations.
In addition, damage or performanc
Pan-European eCall System
Elements of the Pan-European eCall system,
installed in passenger compartment:
Microphone
SOS button
LED
SOS button: the driver/passenger makes
an emergency call to the single duty dispatch
service by pressing the button.
LED: Th
Categories
- Home
- KIA Niro EV, Hybrid - Second generation - (SG2) (2021-2024) - Owner's manual
- Kia Niro - First generation - (DE) (2017-2022) - Service and Repair Manual
- Contact Us