KIA Niro: Coolant Repair procedures
Warning
Never remove the radiator cap when the engine is hot. Serious scalding could be caused by hot fluid under high pressure escaping from the radiator.
Warning
When pouring engine coolant, shut the relay box lid and be careful not to spill coolant on the electrical parts or the paint. Rinse off any spilt coolant immediately.
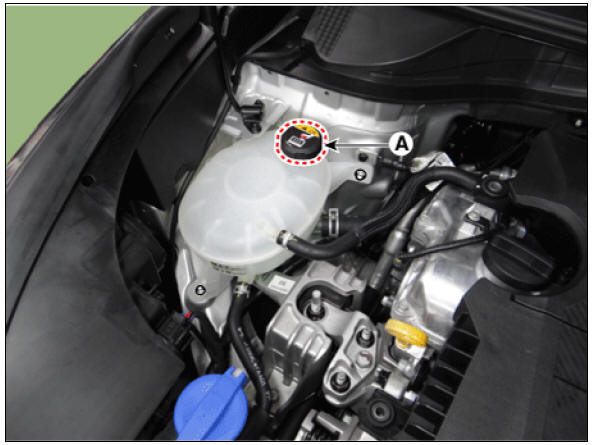
- Make sure the engine and radiator are cool to the touch.
- Remove the pressure cap (A).
- Remove the engine room under cover.
(Refer to Engine and Transaxle Assembly - "Engine Room Under Cover")
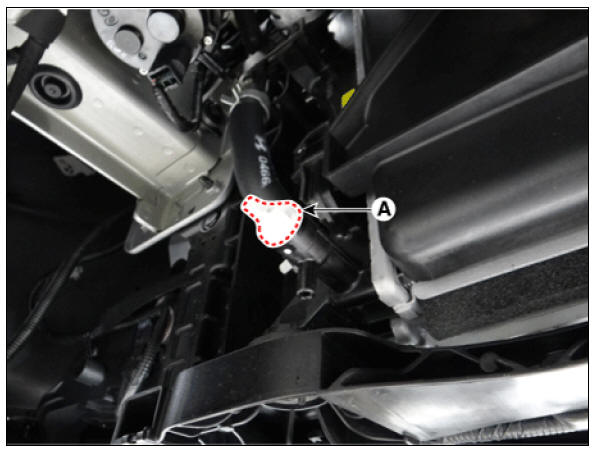
- Loosen the drain plug (A), and drain the coolant.
- Tighten the radiator drain plug securely.
- Clean the reservoir tank.
- Fill the reservoir tank with coolant and tighten the pressure cap.
- Start the engine and allow it to come to normal operating temperature. Wait for the cooling fans to turn on several times. Accelerate the engine to aid in purging trapped air. Shut engine off.
Warning
Rev-up the engine 2 to 3 times to let out the air in the coolant.
Note that revving the engine to high RPM
may activate the "HEV Warning Lamp", so do NOT apply excessive pressure when
engaging the accel
pedal.
(If "HEV Warning Lamp" turns ON, turn OFF the engine and start it back up for normal operation.)
- Wait until the engine is cool.
- Repeat steps 1 to 8 until the drained water runs clear.
- Fill fluid mixture with coolant and water (55 - 60%) (except for North America, Europe and China: 45 - 50%) slowly through the reservoir tank. Push the upper/lower hoses of the radiator so as bleed air easily.
Warning
- Use only the specified antifreeze/coolant.
- For best corrosion protection, the coolant concentration must
be maintained year-round at 55%
(except for North America, Europe and China: 45%) minimum.
Coolant concentrations less than 55% (except for North America, Europe and China: 45%) may not
provide sufficient protection against corrosion or freezing. - Coolant concentrations greater then 60% will impair cooling efficiency and are not recommended.
- Always use new coolant.
Warning
- Do not mix different brands of antifreeze/coolants.
- Do not use additional rust inhibitors or antirust products; they may not be compatible with the coolant.
- Start the engine and run until coolant circulates. When the cooling fan operates and coolant circulates, refill coolant through the reservoir tank.
- Repeat step 12 until the cooling fan operates 3 - 5 times and bleed air sufficiently out of the cooling system.
- Fill the reservoir tank to the "MAX" (or "FULL") line with coolant and tighten the pressure cap.
- Run the vehicle under idle until the cooling fan operates 2 - 3 times.
- Stop the engine and wait coolant gets cool.
- Repeat steps 11 to 16 until the coolant level doesn't fall any more, bleed air out of the cooling system.
Warning
It takes time to bleed out all the air in the cooling system. Refill coolant when coolant gets cool completely, then recheck the coolant level in the reservoir tank for 2 - 3 days after replacing coolant.
Coolant capacity : Approx. 5.8 L (1.53 U.S.gal., 6.13 U.S.qt., 5.10 lmp.qt.)
READ NEXT:
 Cooling Fan Repair procedures | Cooling Fan Assembly
Cooling Fan Components and components location
Components
Cooling fan
Cooling fan motor
Cooling fan shroud
Air dam
Cooling fan controller (PWM)
Description
Controls the cooling fan motor voltage depending on the duty
Cooling Fan Control Module (PWM) | Radiator
Disconnect the battery negative terminal.
Remove the air duct.
(Refer to Intake and Exhaust System - "Air Cleaner")
Disconnect the cooling fan control module (PWM) connector (A) and cooling fan motor
SEE MORE:
Forward Collision-Avoidance Assist settings
Forward safety
A: Driver Assistance
Driving Safety
Forward Safety
With the vehicle on, touch Settings ?
Driver Assistance ? Driving Safety on
the instrument cluster or Settings ?
Vehicle ? Driver Assistance ? Driving
Safety on t
Fuel Pressure Test (Low pressuresystem)
Release the residual pressure in fuel line.
(Refer to the Fuel Delivery System - Inspection - "Release Residual Pressure
in Fuel Line").
Warning
When removing the fuel pump fuse, a Diagnostic Trouble Code (DTC)
may occur. De
Categories
- Home
- KIA Niro EV, Hybrid - Second generation - (SG2) (2021-2024) - Owner's manual
- Kia Niro - First generation - (DE) (2017-2022) - Service and Repair Manual
- Contact Us