KIA Niro: Windshield Glass / Repair Procedures
Kia Niro - First generation - (DE) (2017-2022) - Service and Repair Manual / Body (Interior And Exterior) / Windshield Glass / Windshield Glass / Repair Procedures
Windshield Glass / Components And Components Location
- Windshield glass
Windshield Glass / Repair Procedures
Removal
Warning
Put on gloves to protect your hands.
Warning
Use seat covers to avoid damaging any surfaces.
- Remove the front pillar trim.
(Refer to Cowl Top Cover - "Repair procedures")
- Remove the inside rear view mirror assembly.
(Refer to Mirror - "Inside Rear View Mirror")
- Remove the cowl top cover.
(Refer to Cowl Top Cover - "Repair procedures")
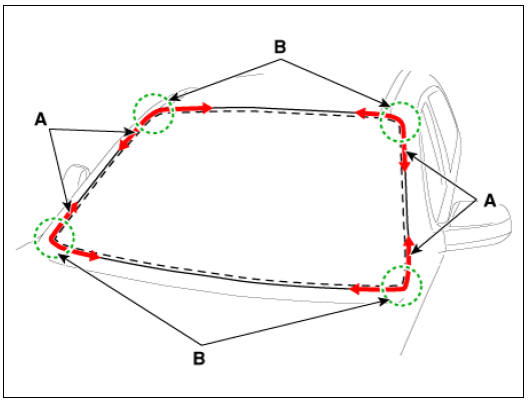
- Cut out the adhesive using a cutter (A).
Warning
Use a cutter with a blade length between 8-12 inches.
- Cut off the sealant on the edge (B) while pulling the piano wire (A) left and right.
Warning
- Put on gloves to protect your hands.
- Be careful not to burn your hands as excessive heat may be generated when working on wires.
- Be careful not to break the piano wire.
- If the piano wire (A) is visible outside the chassis, push it back into the chassis.
- Cut off the sealant on (A-A), (B-B), (C-C), while pulling a piano wire (A) left and right.
Warning
- Put on gloves to protect your hands.
- Be careful not to burn your hands as excessive heat may be generated when working on wires.
- Be careful not to break the piano wire.
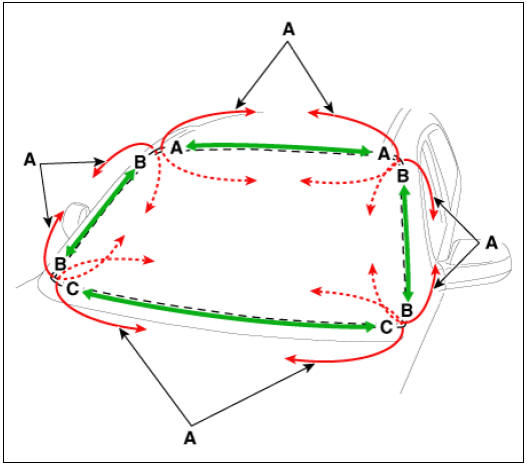
- Carefully lift up the windshield glass (B) by using a glass holder (A).

READ NEXT:
 Windshield Glass / Installation
Warning
When replacing the windshield glass fitted with
the front camera, be sure to replace it with the
replacement windshield glass fitted with the coupler. If attaching the coupler
on the windshield
glass without coupler, the front camera m
Tailgate Window Glass
Tailgate window glass
Removal
Warning
Put on gloves to prevent hand injuries.
Warning
Use seat covers to avoid damaging any surfaces.
Remove the tailgate Trim.
(Refer to Tailgate - "Tailgate Trim")
Remove the rear view
SEE MORE:
Green Zone Drive Mode for Europe (Kia NIRO Hybrid)
In order to protect the atmospheric environment
in urban areas, EV mode is
expanded when entering the road inside
the green zone based on the navigation
information.
Also, EV mode is expanded based on the
driving history when departing from
Blower Motor Repair procedures | Climate Control Air Filter Repair procedures
Inspection
Operate the heater controls at IGN2 to ensure that the motor is running.
Battery (+)
Input signal
Ė—
Ground
If the blower motor does not operate well, substitute with a known-good blower mo
Categories
- Home
- KIA Niro EV, Hybrid - Second generation - (SG2) (2021-2024) - Owner's manual
- Kia Niro - First generation - (DE) (2017-2022) - Service and Repair Manual
- Contact Us