KIA Niro: Thermostat Repair procedures
Removal and
Installation
Warning
Disassembly of the thermostat may have an adverse effect, causing deteriorated cooling efficiency. Do not remove the thermostat, even if the engine tends to overheat.
- Remove the engine room under cover.
(Refer to Engine and Transaxle Assembly - "Engine Room Under Cover")
- Drain the coolant.
(Refer to Cooling System - "Coolant")
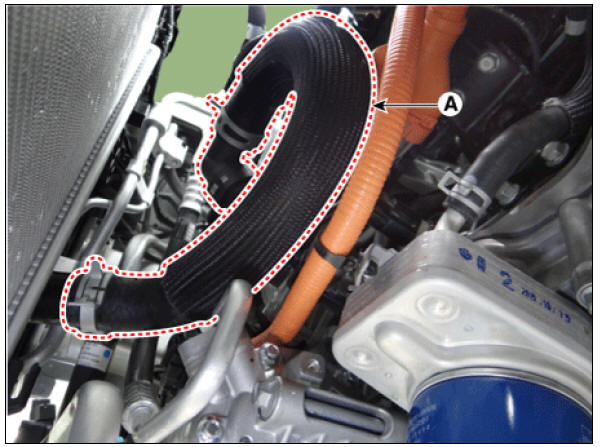
- Disconnect the radiator lower hose (A).
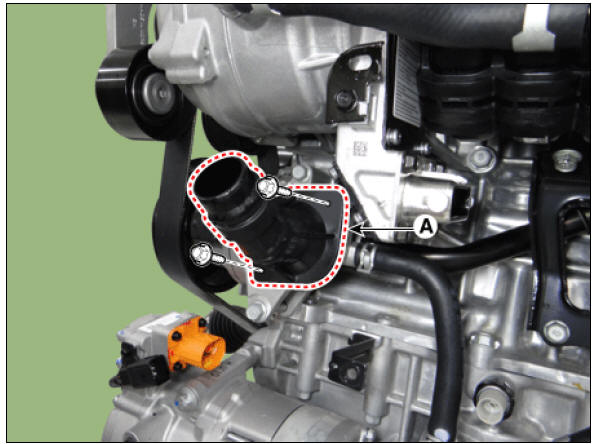
- Remove the water inlet fitting (A).
Tightening torque : 18.6 - 23.5 N*m (1.9 - 2.4 kgf*m, 13.7 - 17.4 lb*ft)
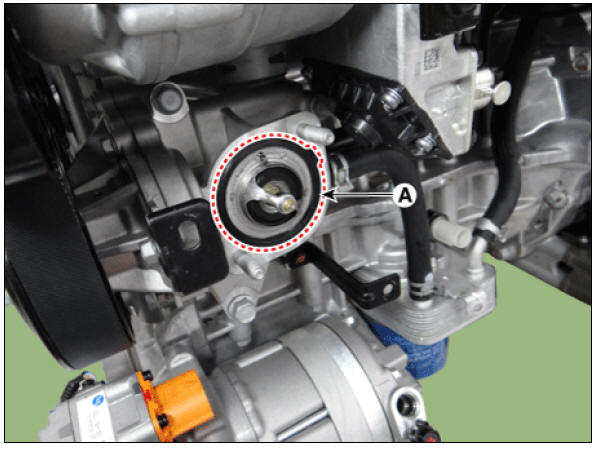
- Remove the thermostat (A).
- Install in the reverse order of removal.
Warning
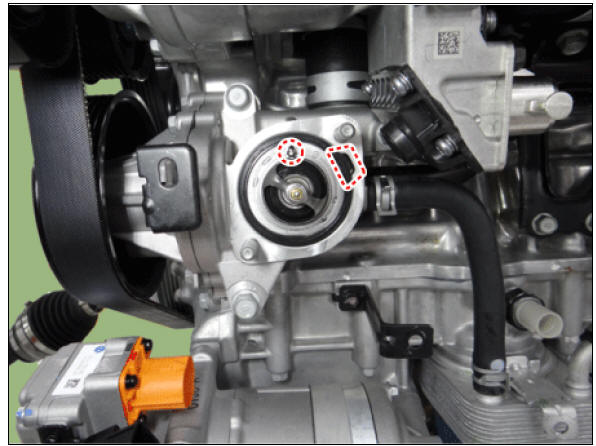
- Install the thermostat with the jiggle valve facing upward.
- When assembling the thermostat, place the thermostat on the housing so that the protrusion of thermostat matches with the groove of the housing and then install the inlet fitting. Be sure that the thermostat stays in the groove on the housing.
- Clean surface on the rubber packing contact surface.
- Fill the engine coolant.
(Refer to Cooling System - "Coolant")
- Start the engine and check for leaks.
- Recheck the coolant level
Inspection
- Immerse thermostat in water heated to over 95ºC (203ºF), then heat for at least 3 minutes to check valve lift.

Warning
- Do not use water below 95ºC (203ºF).
- Do not directly heat unit as this will damage thermostat.
- Check the valve opening temperature.
If the valve opening temperature is not as specified, replace the thermostat.
Valve opening temperature : 88 +- 1.5ºC (190.4 +- 34.7ºF) Full opening temperature : 100ºC (212ºF)
- Check the valve lift.
If the valve lift is not as specified, replace the thermostat.
Valve lift : 8 mm (0.3 in.) or more at 100ºC (212ºF)
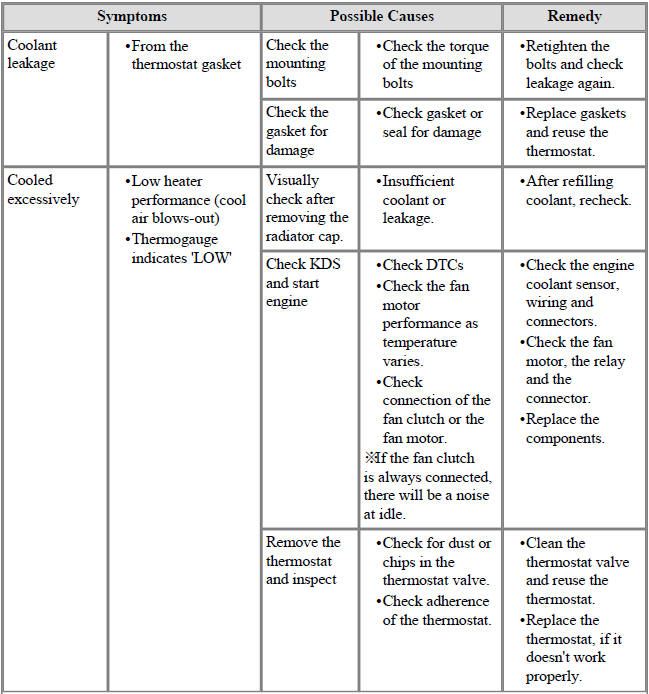
Troubleshooting

READ NEXT:
 Water Temperature Control Assembly
Removal and Installation
Water Temperature Control Assembly
Disconnect the battery negative terminal.
Loosen the drain plug, and drain the engine coolant. Remove the
reservoir cap to help drain the coolant
faster.
(Refer to Cool
Heater Pipe | Active Air Flap (AAF) Repair procedure
Disconnect the battery negative terminal.
Loosen the drain plug, and drain the engine coolant. Remove the reservoir cap to help drain the coolant faster.
(Refer to Cooling System - "Coolant")
Remove
SEE MORE:
Rear Lower and Upper Arm Repair procedures
Removal
Disconnect the battery negative cable.
Remove the wheel and tire.
Tightening torque: 107.9 - 127.5 N*m (11.0 - 13.0 kgf*m, 79.6 - 94.0 lb*ft)
Warning
Be careful not to damage the wheel nuts when removing the wheel and tire
AVN System / Description And Operation
AVN System / Components And Components Location
AVN head unit
External amplifier
Crash pad LTE antenna
Roof LTE antenna
Multimedia jack
Steering wheel remote control (SWRC)
Hands-free mic (Built-in overhead console)
Description
Categories
- Home
- KIA Niro EV, Hybrid - Second generation - (SG2) (2021-2024) - Owner's manual
- Kia Niro - First generation - (DE) (2017-2022) - Service and Repair Manual
- Contact Us