KIA Niro: Keyless Entry And Burglar Alarm / Repair Procedures
Inspection
Warning
- When removing with a flat-tip screwdriver or remover, wrap protective tape around the tools to prevent damage to components.
- When removing the interior trim pieces, use a plastic panel removal tool not to damage the surface.
- Be careful to store and handle the trim when removing/installing because lubricant and oil can leave a stain on the trim.
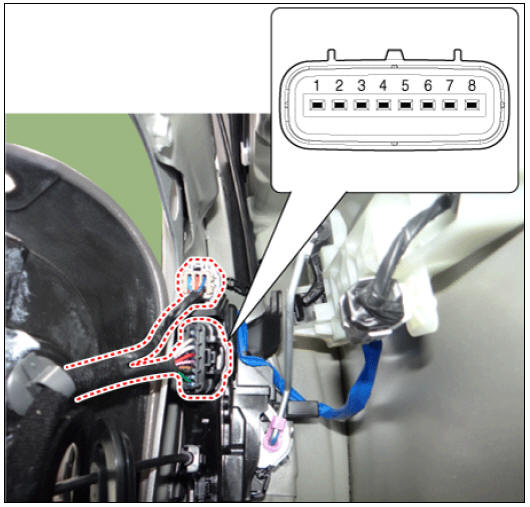
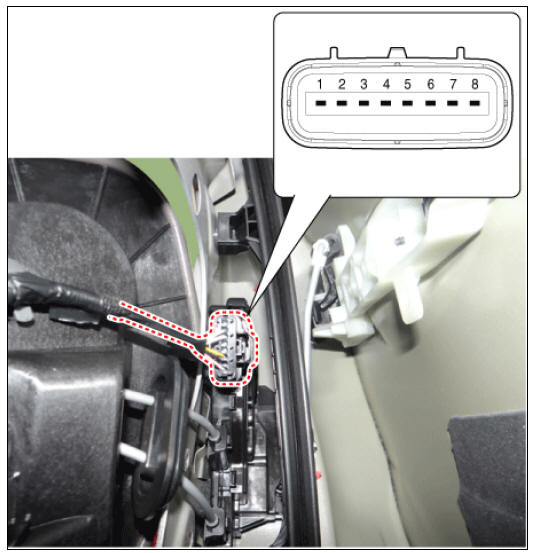
Front Door Lock Module Inspection
- Remove the front door trim.
(Refer to Body - "Front Door Trim")
- Remove the front door module.
(Refer to Body - "Front Door Module")
- Disconnect the connector from the actuator.
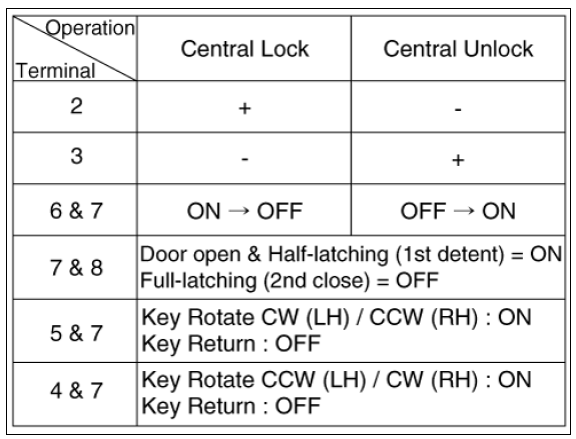
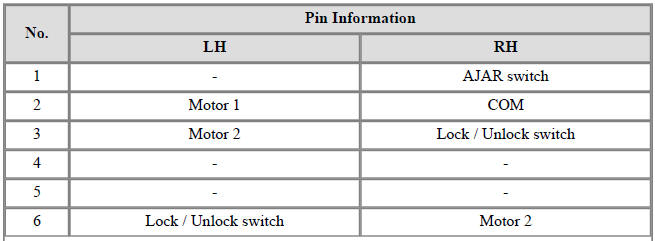
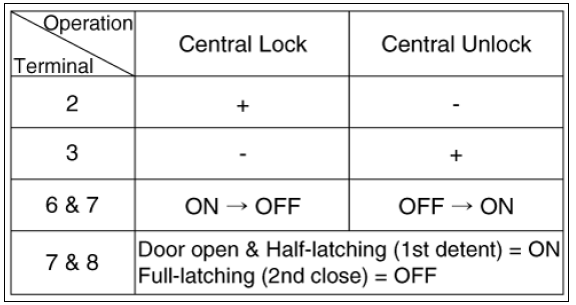
Central Lock Motor
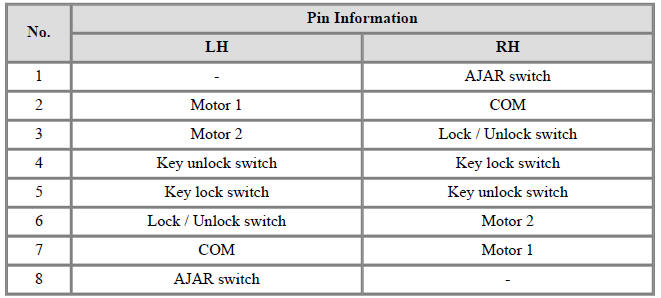
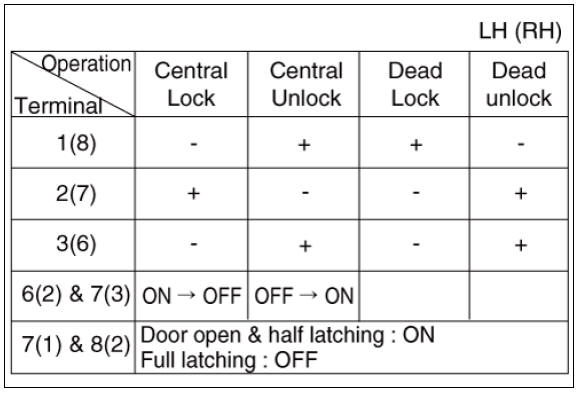
Dead Lock Motor
- Check actuator operation by connecting power and ground as shown below. To prevent damage to the actuator, apply battery voltage only momentarily.
Central Lock Motor
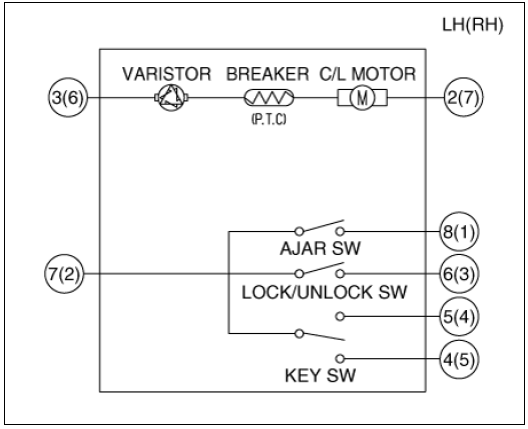
Dead Lock Motor
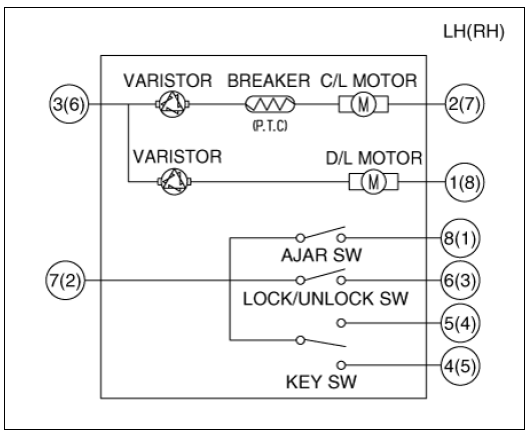
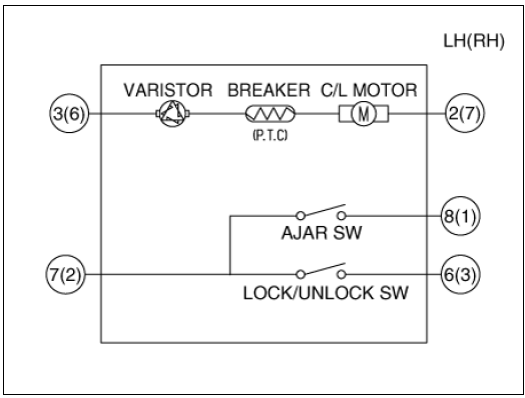
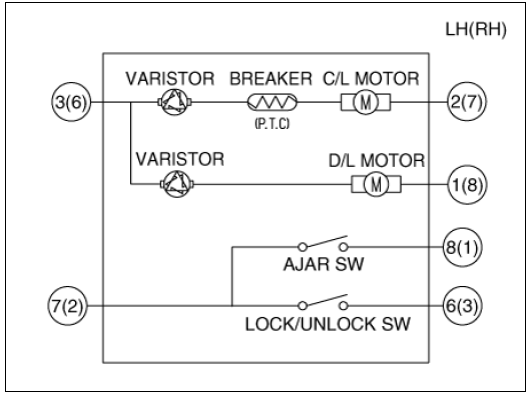
Central Lock Motor
(LH)
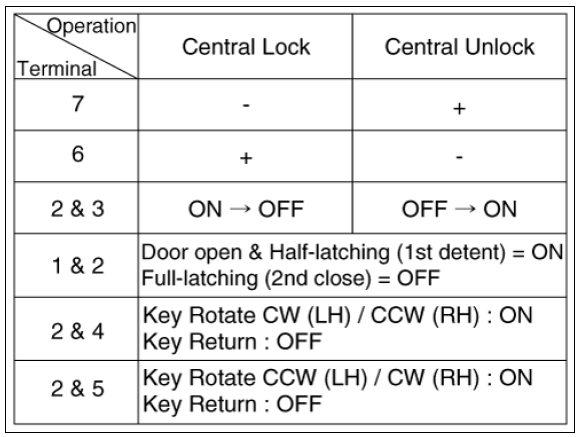
Dead Lock Motor
Rear Door Lock Module Inspection
- Remove the rear door trim.
(Refer to Body - "Rear Door Trim")
- Remove the rear door module.
(Refer to Body - "Rear Door Module")
- Disconnect the connector from the actuator.
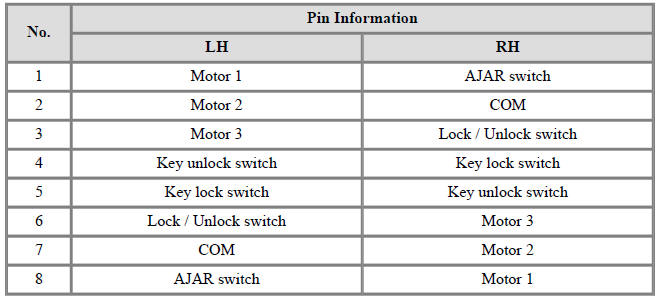
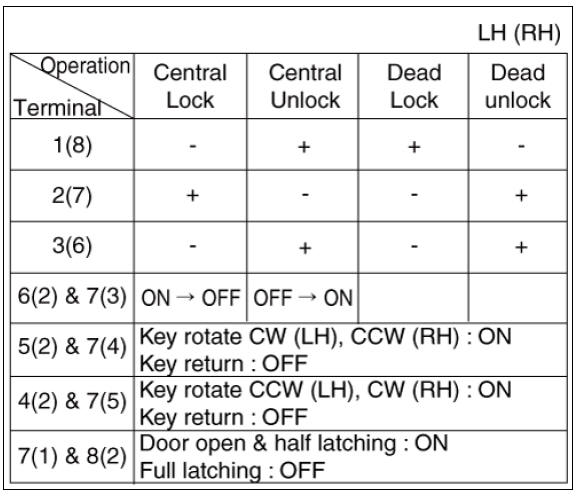
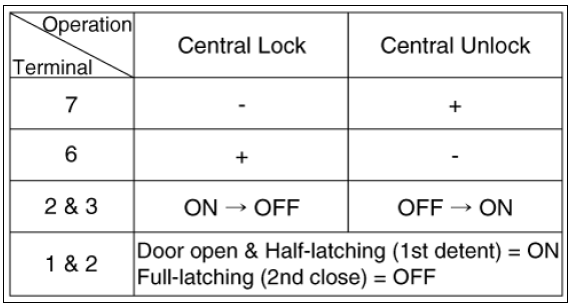
Central Lock Motor

Dead Lock Motor
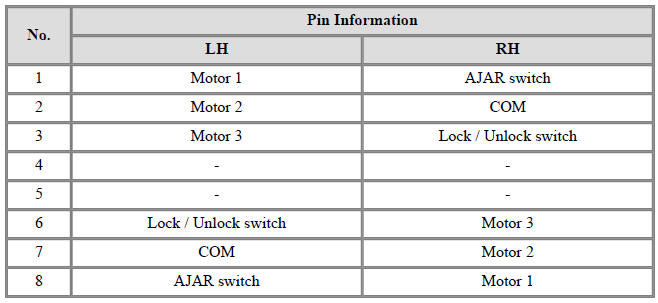
- Check actuator operation by connecting power and ground as shown below. To prevent damage to the actuator, apply battery voltage only momentarily.
Central Lock Motor
Dead Lock Motor
Central Lock Motor
(LH)
(RH)
Dead Lock Motor
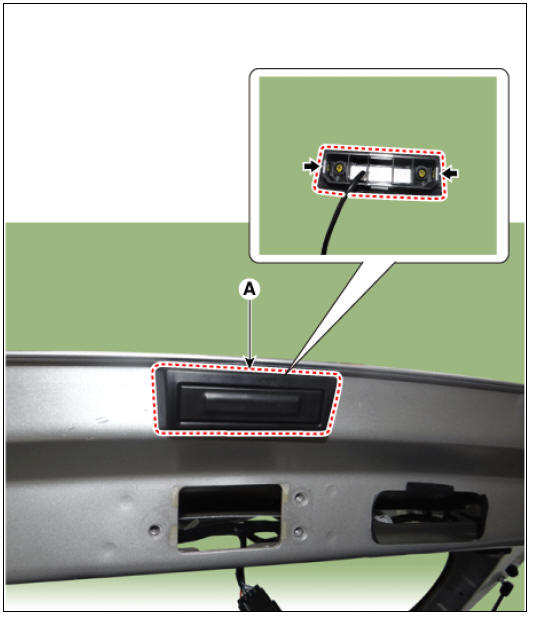
Tailgate Lock Module Inspection
- Remove the tailgate trim.
(Refer to Body - "Tailgate Trim")
- Disconnect the connectors from the actuator.
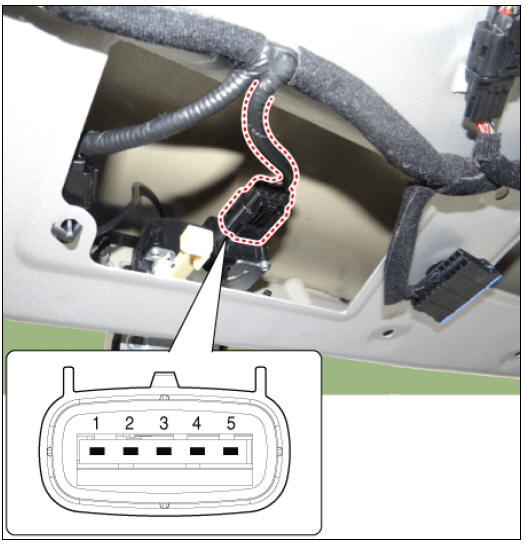
- Check actuator operation by connecting power and ground as shown below. To prevent damage to the actuator, apply battery voltage only momentarily.
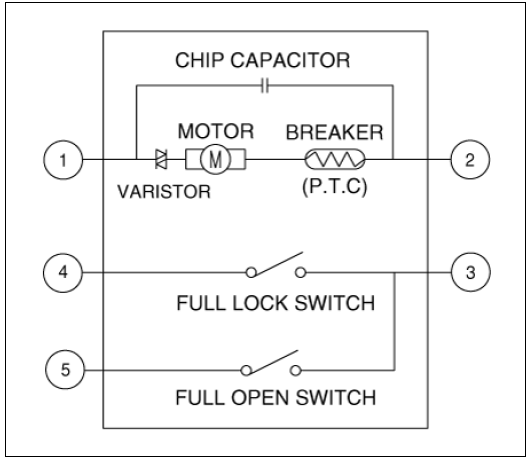
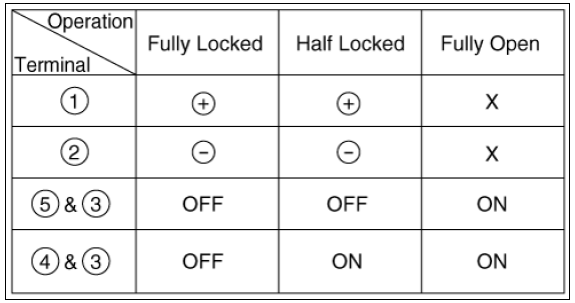
- Checking the tailgate of the vehicle power option power refers to the tailgate module.
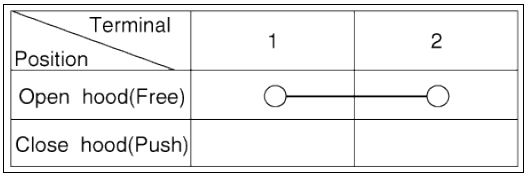
Tailgate Open Switch Inspection
- Disconnect the negative (-) battery terminals.
- Remove the tailgate latch.
(Refer to Body - "Tailgate Latch")
- Disconnect the tailgate open switch assembly connector.
- Check for continuity between terminals in half latching condition as shown below.
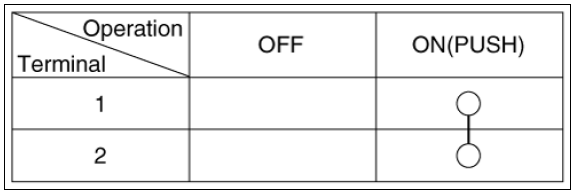
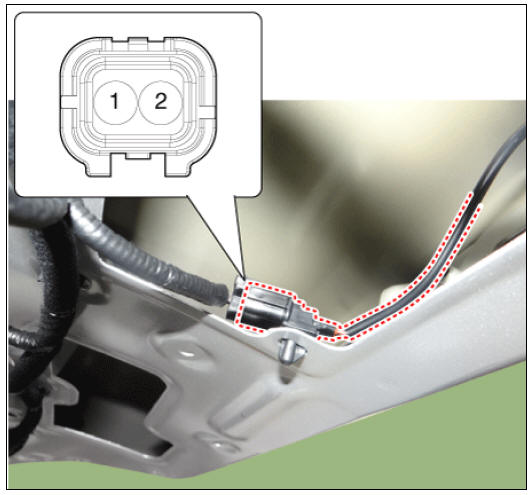
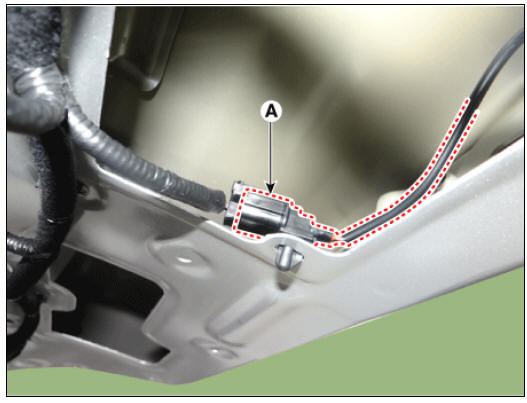
Hood Switch Inspection
- Disconnect the hood switch connector (A).
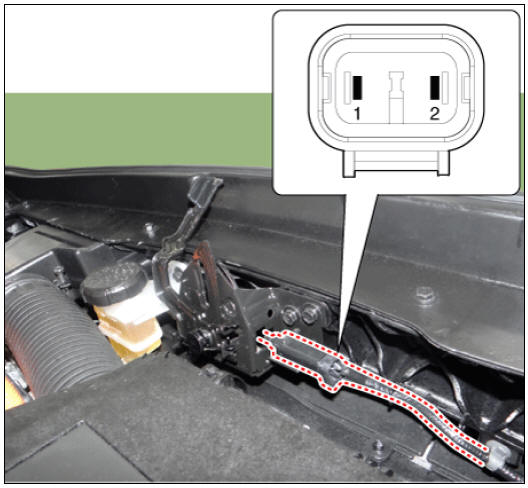
- Check for continuity between the terminals and ground as shown below.
(Refer to Body - "Hood Latch")
Removal
Front Door Lock Module
- Remove the front door latch.
(Refer to Body - "Front Door Latch")
Rear Door Lock Module
- Remove the rear door latch.
(Refer to Body - "Rear Door Latch")
Tailgate Lock Module
- Remove the Tailgate lid latch.
(Refer to Body - "Tailgate Latch")
Tailgate Lid Handle
- Remove the tailgate latch.
(Refer to Body - "Tailgate Latch")
- Disconnect the connector (A) and then remove the connector fixing clip.
- Remove the tailgate lid handle (A) by pushing the fixing hooks.
Installation
- Install in the reverse order of removal.
READ NEXT:
 Lighting System
Lighting System / Components And Components Location
Specifications
Lighting System / Components And Components Location
Headlamp (Low/High BI-Function)
Turn signal lamp
Sub low beam
Daytime running light, Position lamp
Fog
Headlamps Description and operation | Lighting System / Headlamps Repair Procedures
Description
BI-FUNCTION
Definition
A headlamp with integrated functions of high and low beam
The light is controlled by rotating the shield inserted to the lens. (A solenoid is adopted.)
Structure and mechanism
SEE MORE:
Rear Cross-Traffic Collision-Avoidance Assist malfunction
A: Check blind-spot safety systems
When Rear Cross-Traffic Collision-
Avoidance Assist is not working properly,
the warning message will appear on
the cluster for several seconds, and the
master ( ) warning light will
appear on
the cluste
ETC (Electronic Throttle Control) System Repair
Inspection
Connect the KDS on the Data Link Connector (DLC).
Start the engine and measure the output voltage of TPS 1 and 2 at C.T.
and W.O.T.
Throttle Position Sensor (TPS)
ETC Motor
Switch "OFF" the ignition.
Discon
Categories
- Home
- KIA Niro EV, Hybrid - Second generation - (SG2) (2021-2024) - Owner's manual
- Kia Niro - First generation - (DE) (2017-2022) - Service and Repair Manual
- Contact Us