KIA Niro: Fuel Pump Repair procedures
Kia Niro - First generation - (DE) (2017-2022) - Service and Repair Manual / Engine Control / Fuel System / Fuel Delivery System / Fuel Pump Repair procedures
Fuel sender
- Turn the ignition switch OFF, and then remove battery (-) terminal.
- Remove the fuel pump assembly.
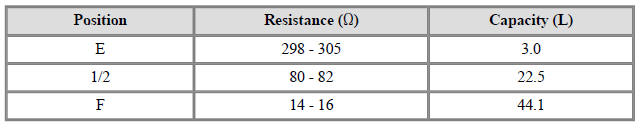
- Using an ohmmeter, measure the resistance between terminals 1 and 6 of sender connector (A) at each float level.
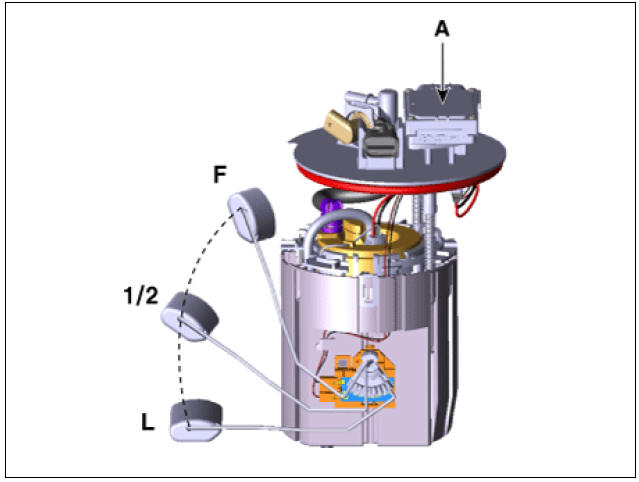


- Also check that the resistance changes smoothly when the float moves from "E" to "F".
Removal
- Release the residual pressure in fuel line.
(Refer to the Fuel Delivery System - "Release Residual Pressure in Fuel Line")
- Switch "OFF" the ignition and disconnect the negative (-) battery terminal.
- Remove the rear seat cushion.
(Refer to Body - "Rear Seat Assembly")
- Fuel pump service cover (A).

Warning
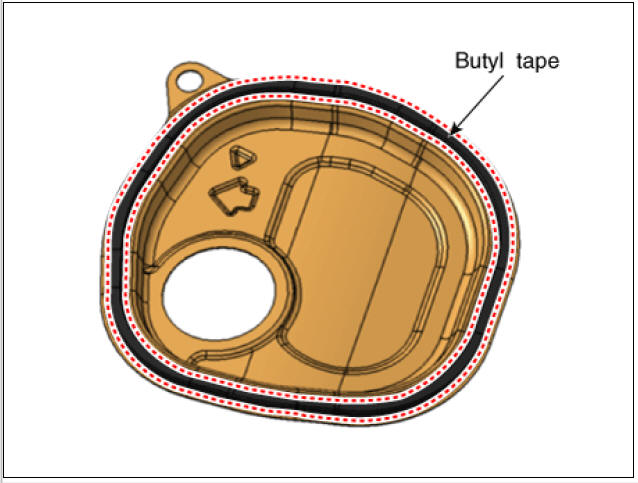
- When reinstalling a protective cover for a fuel pump, remove the existing butyl tape and apply a new one.
- Before assembling the protective cover, ensure that the
temperature of the butyl is about 30º
C using a hair dryer or a heat gun.
Warning
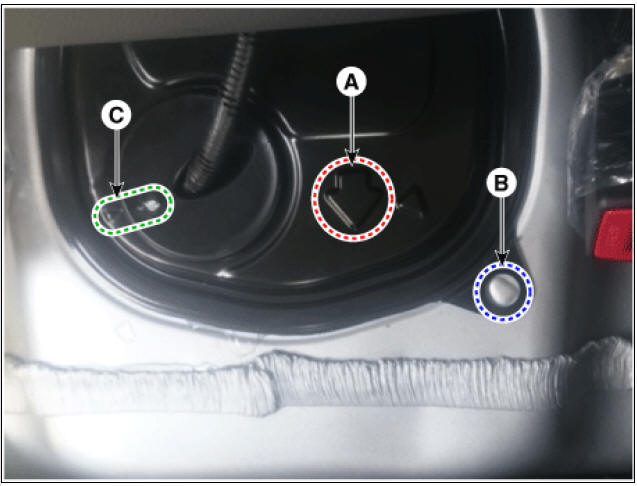
When installing the protective cover for the fuel pump, pay attention to the installation direction of the grommet and the protective cover.
- The arrow (A) should be in the forward direction of the car.
- Align the bulging part of the vehicle body (B) with the hole of the protective cover.
- Align the bulging part of the grommet (C) with the bulging part
of the protective cover
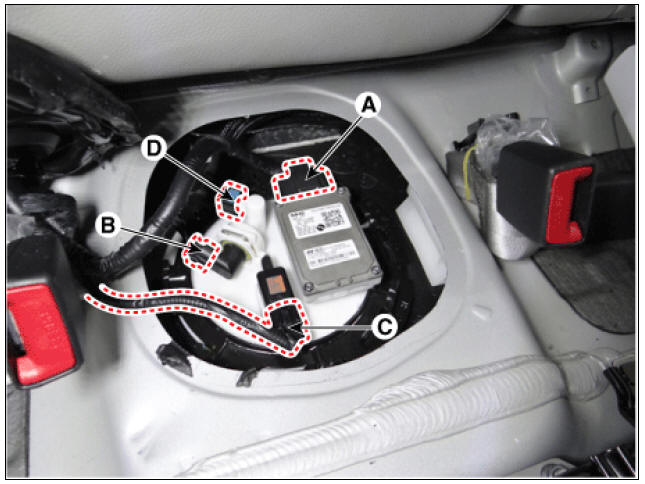
- Remove the fuel pump control module connector (A).
- Disconnect the fuel pressure sensor connector (B).
- Disconnect the fuel tank pressure sensor (C).
- Disconnect the fuel feed tube quick-connector (D).
- Remove the fuel pump plate cover (B) by using the special service tool
(A) (SST NO.:09310-
B8100).
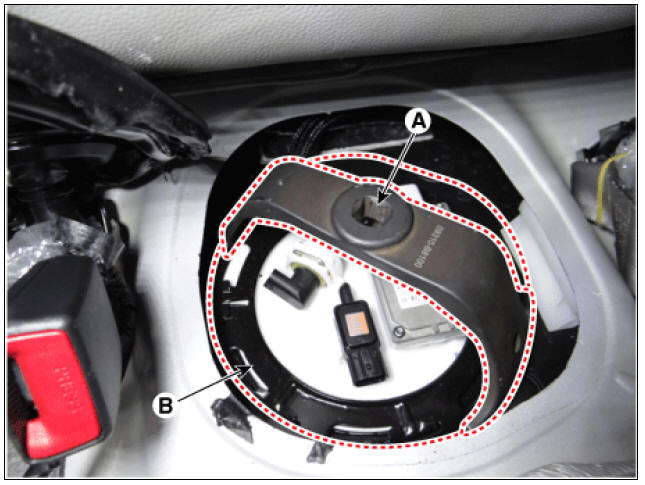
- Remove the fuel pump (A).

Installation
- Install in the reverse order of removal.
Warning
Carefully note the fuel pump direction during installation.
READ NEXT:
 Fuel Filter Repair procedures
Removal
Remove the fuel pump.
(Refer to Fuel Delivery System - "Fuel Pump")
Disconnect the fuel pump motor connector (A) and fuel sender connector
(B).
Lift the fixing hook (A) by using a common driver, and then remov
Fuel Pump Motor Repair procedures
Removal
Remove the fuel pump.
(Refer to Fuel Delivery System - "Fuel Pump")
Disconnect the fuel pump motor connector (A) and fuel sender connector
(B).
Lift the fixing hook (A) by using a common driver, and then remov
Fuel Sender Repair procedures
Removal
Remove the fuel pump.
(Refer to Fuel Delivery System - "Fuel Pump")
Disconnect the fuel sender connector (A).
Lift the fixing hook (A) by using a common driver, and then remove the
fuel sender (B).
SEE MORE:
Accelerator Position Sensor (APS)
Specification
Accelerator Position Sensor (APS) Description and operation
Description
Installed on the accelerator pedal module, the Accelerator Position Sensor (APS)
detects the rotation
angle of the accelerator pedal. The APS is one o
Wheel alignment and tire
balance
The wheels on your vehicle were aligned
and balanced carefully at the factory to
give you the longest tire life and best
overall performance.
If you notice your vehicle vibrating when
driving on a smooth road, your wheels
may need to be rebal
Categories
- Home
- KIA Niro EV, Hybrid - Second generation - (SG2) (2021-2024) - Owner's manual
- Kia Niro - First generation - (DE) (2017-2022) - Service and Repair Manual
- Contact Us