KIA Niro: Battery Terminal | Battery Condition
Check the battery voltage and status using the battery tester.
Battery Terminal
- Move back and forth to check that the battery terminals (A) are loose or corroded.If the terminals are corroded, clean them.
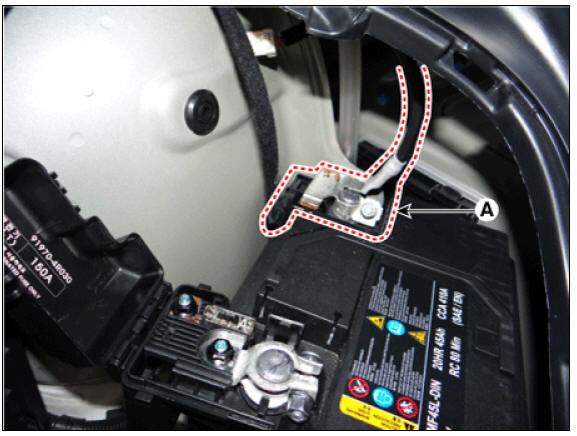

If battery positive connection is loose, disconnect ground(GND) cable first before attempting to remove or tighten plus connection, to prevent personal injury.
- If the battery clamp on battery positive (+) terminal is not seated securely:
(1) Turn ignition switch OFF and disconnect the battery negative (-) terminal.
(2) Tighten battery clamp (A) on battery positive (+) terminal
Battery positive (+) terminal tightening nut : 7.8 - 9.8 N*m (0.8 - 1.0 kgf*m, 5.8 - 7.2 lb*ft)
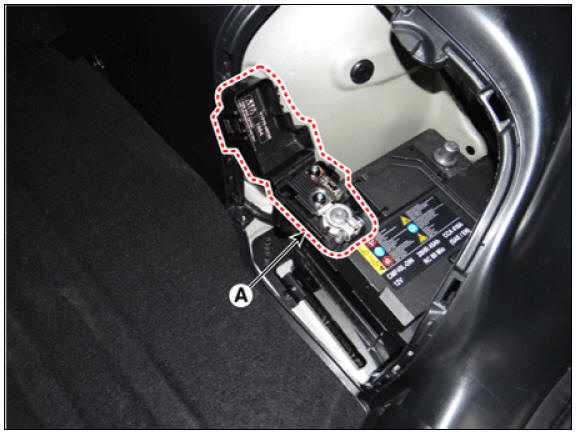
- If the battery clamp on battery negative (-) terminal is not seated securely:
(1) Tighten battery clamp (A) on battery negative (-) terminal.
Battery negative (-) terminal tightening nut : 7.8 - 9.8 N*m (0.8 - 1.0 kgf*m, 5.8 - 7.2 lb*ft)

Battery Condition
Check the battery for damage or deformation. If severe damage, deformation or leakage is found, replace the battery.
Vehicle parasitic current inspection
Using the Ammeter
- Turn the all electric devices OFF, and then turn the ignition switch OFF.
- Close all doors except the tailgate, and then lock all doors.
- Disconnect the tailgate latch connector.
- Wait a few minutes until the vehicle's electrical systems go to sleep mode.
Warning
For an accurate measurement of a vehicle parasitic current, all electrical systems should go to sleep mode. (It takes at least one hour or at most one day.) However, an approximate vehicle parasitic current can be measured after 10-20 minutes.
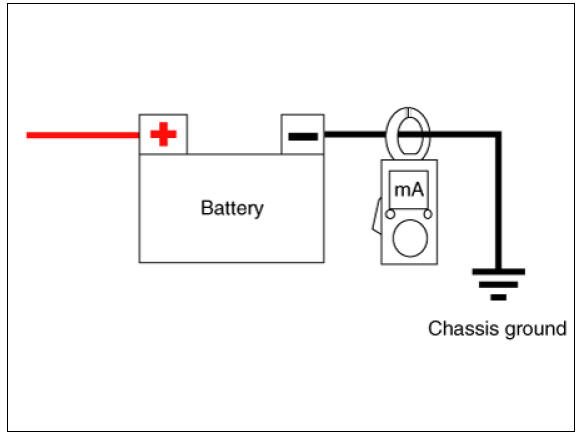
- Connect an ammeter in series between the battery (-) terminal and the ground cable, and then disconnect the clamp from the battery (-) terminal slowly.
Warning
Be careful that the lead wires of an ammeter do not come off from the battery (-) terminal and the ground cable to prevent the battery from being reset. In case the battery is reset, connect the battery cable again, and then start the engine or turn the ignition switch ON for more than 10 sec. Repeat the procedure from No. 1.
To prevent the battery from being reset during the inspection,
1) Connect a jump cable between the battery (-) terminal and the ground cable.
2) Disconnect the ground cable from the battery (-) terminal.
3) Connect an ammeter between the battery (-) terminal and the ground cable.
4) After disconnecting the jump cable, read the current value of the ammeter.
- Read the current value of the ammeter.
- If the parasitic current is over the limit value, search for abnormal circuit by removing a fuse one by one and checking the parasitic current.
- Reconnect the suspected parasitic currentdraw circuit fuse only and search for suspectedunit by removing the component connected with thecircuit one by one until the parasitic draw dropsbelow limit value.
Limit value (after 10-20 min.) : Below 50mA
Using the Clamp type Ammeter
- Turn the all electric devices OFF, and then turn the ignition switch OFF.
- Close all doors except the tailgate, and then lock all doors.
- Disconnect the tailgate latch connector.
- Wait a few minutes until the vehicle's electrical systems go to sleep mode.
Warning
For an accurate measurement of a vehicle parasitic current, all electrical systems should go to sleep mode. (It takes at least one hour or at most one day.) However, an approximate vehicle parasitic current can be measured after 10 - 20 minutes.
- Install the clamp type ammerter on battery negative (-) terminal.
- Read the current value of the ammeter.
- If the parasitic current is over the limit value, search for abnormal circuit by removing a fuse one by one and checking the parasitic current.
- Reconnect the suspected parasitic currentdraw circuit fuse only and search for suspectedunit by removing the component connected with thecircuit one by one until the parasitic draw dropsbelow limit value.
Limit value (after 10-20 min.) : Below 50mA
READ NEXT:
 Battery Tester- The Micro 570 Analyzer
The Micro 570 Analyzer
The Micro 570 Analyzer provides the ability to test the charging and starting
systems, including the battery, starter
and alternator.
Warning
Because of the possibility of personal injury, always use
extreme caution
Battery Tester - The MDX-670P Analyzer
The MDX-670P battery conductance and electrical system analyzer tests
batteries as well as starting and charging
systems for vehicle.
It displays the test results in seconds and features a built-in printer to
provide a copy of the results.
SEE MORE:
Cooling Fan Repair procedures | Cooling Fan Assembly
Cooling Fan Components and components location
Components
Cooling fan
Cooling fan motor
Cooling fan shroud
Air dam
Cooling fan controller (PWM)
Description
Controls the cooling fan motor voltage depending on the duty
Fender
Fender assembly
Fender / Repair Procedures
Replacement
Warning
Be careful not to damage the fender and body.
Use a plastic panel removal tool to remove interior trim pieces
without marring the surface.
Remove the head
Categories
- Home
- KIA Niro EV, Hybrid - Second generation - (SG2) (2021-2024) - Owner's manual
- Kia Niro - First generation - (DE) (2017-2022) - Service and Repair Manual
- Contact Us