KIA Niro: Power Door Lock Module Repair procedures
Kia Niro - First generation - (DE) (2017-2022) - Service and Repair Manual / Body Electrical System / Power Door Locks / Power Door Lock Module Repair procedures
Inspection
Warning
- When removing with a flat-tip screwdriver or remover, wrap protective tape around the tools to prevent damage to components.
- When removing the interior trim pieces, use a plastic panel removal tool not to damage the surface.
- Be careful to store and handle the trim when removing/installing because lubricant and oil can leave a stain on the trim.
Front Door Lock Module Inspection
- Remove the front door trim.
(Refer to Body - "Front Door Trim")
- Remove the front door module.
(Refer to Body - "Front Door Module")
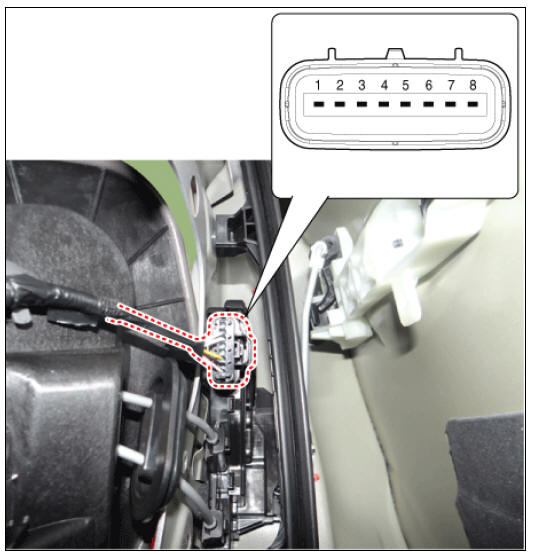
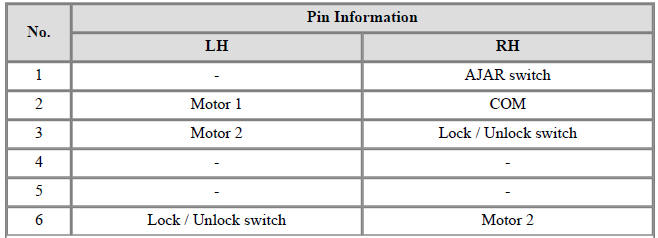
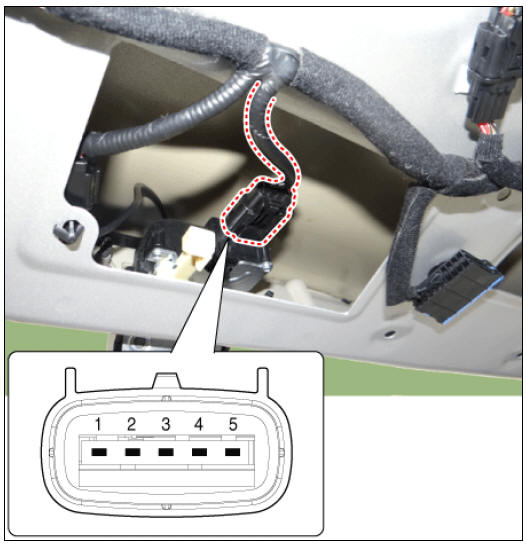
- Disconnect the connector from the actuator.

Central Lock Motor
Dead Lock Motor
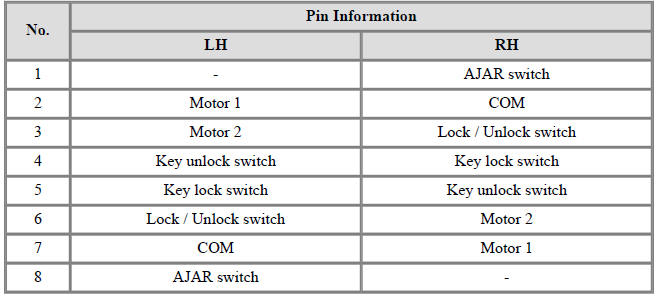
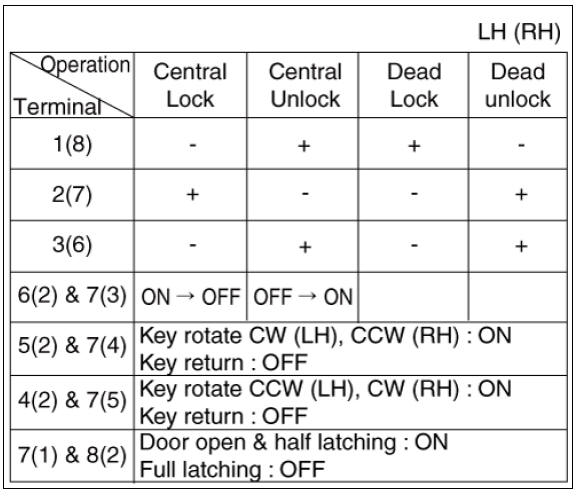
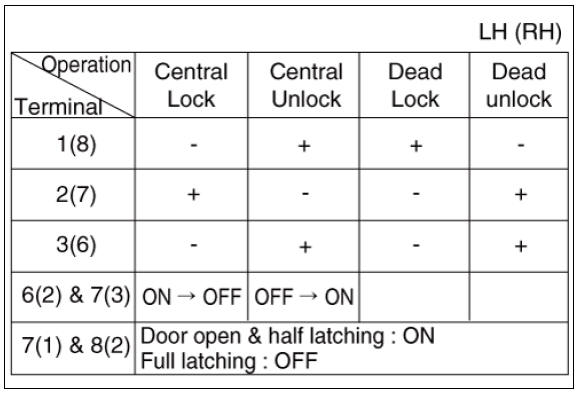
- Check actuator operation by connecting power and ground as shown below. To prevent damage to the actuator, apply battery voltage only momentarily.
Central Lock Motor
Dead Lock Motor
Central Lock Motor
(LH)
(RH)
Dead Lock Motor
Rear Door Lock Module Inspection
- Remove the rear door trim.
(Refer to Body - "Rear Door Trim")
- Remove the rear door module.
(Refer to Body - "Rear Door Module")
- Disconnect the connector from the actuator.
Central Lock Motor

Dead Lock Motor
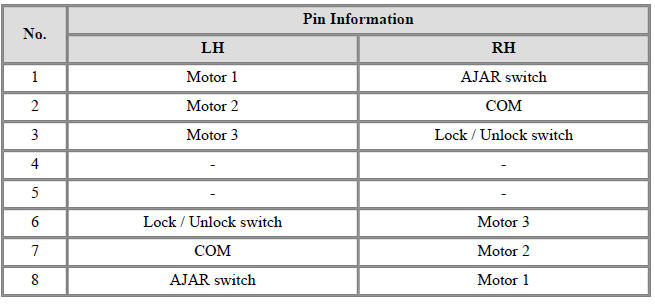
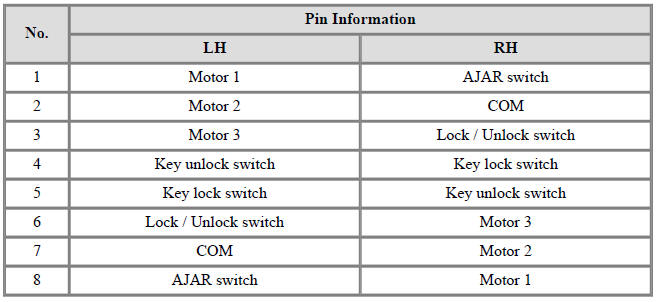
- Check actuator operation by connecting power and ground as shown below. To prevent damage to the actuator, apply battery voltage only momentarily.
Central Lock Motor
Dead Lock Motor
Central Lock Motor
(LH)
(RH)
Dead Lock Motor
Tailgate Lock Module Inspection
- Remove the tailgate trim.
(Refer to Body - "Tailgate Trim")
- Disconnect the connectors from the actuator.
- Check actuator operation by connecting power and ground as shown below. To prevent damage to the actuator, apply battery voltage only momentarily.
- Checking the tailgate of the vehicle power option power refers to the tailgate module.
Removal
Front Door Lock Module
- Remove the front door latch.
(Refer to Body - "Front Door Latch")
Rear Door Lock Module
- Remove the rear door latch.
(Refer to Body - "Rear Door Latch")
Tailgate Lock Module
- Remove the Tailgate lid latch.
(Refer to Body - "Tailgate Latch")
Installation
- Install in the reverse order of removal.
READ NEXT:
 Power Door Lock Switch Repair procedures
Inspection
Non-IMS Type
Check for continuity between the terminals. If there is an abnormality,
replace the switch.
IMS Type
Diagnosis With KDS
The body electrical system can be quickly diagnosed for failed parts by
using v
Power Door Mirrors
Power Door Mirrors / Components And Components Location
Power door mirror
Power door mirror switch
Power folding mirror switch
Connector and Terminal Function
Driver Power Window Switch (Non-IMS Type)
Driver Power Window Swit
Power Door Mirror Switch Repair procedures
Inspection
Non-IMS Type
Disconnect the negative (-) battery terminal.
Remove the front left door trim.
(Refer to Body - "Front Door Trim")
Disconnect the power mirror switch connector from the door trim.
Check for conti
SEE MORE:
Piston, rings
Clean piston.
(1) Using a gasket scraper, remove the carbon from the piston top.
(2) Using a groove cleaning tool or broken ring, clean the piston ring grooves.
(3) Using solvent and a brush, thoroughly clean the piston.
Warning
Do not
Limitations of Forward Collision- Avoidance Assist (Kia Niro EV / Hybrid)
Forward Collision-Avoidance Assist may
not operate properly, or it may operate
unexpectedly under the following circumstances:
The detecting sensor or the surroundings
are contaminated or damaged
The temperature around the front
view came
Categories
- Home
- KIA Niro EV, Hybrid - Second generation - (SG2) (2021-2024) - Owner's manual
- Kia Niro - First generation - (DE) (2017-2022) - Service and Repair Manual
- Contact Us